When you read through the SAMS documentation in its entirety, you should be prepared to use all of the features of the web-application.
SAMS (Symptom Annotation Made Simple) is created for medical professionals and patients to digitally capture a patient's diagnosis, clinical signs, and symptoms. You may also track changes in symptoms over time.
Please note that you, as the user of SAMS, are responsible for ensuring the proper pseudonymisation of patient data as well as obtaining the appropriate consent for research, handling data access and deletion requests.
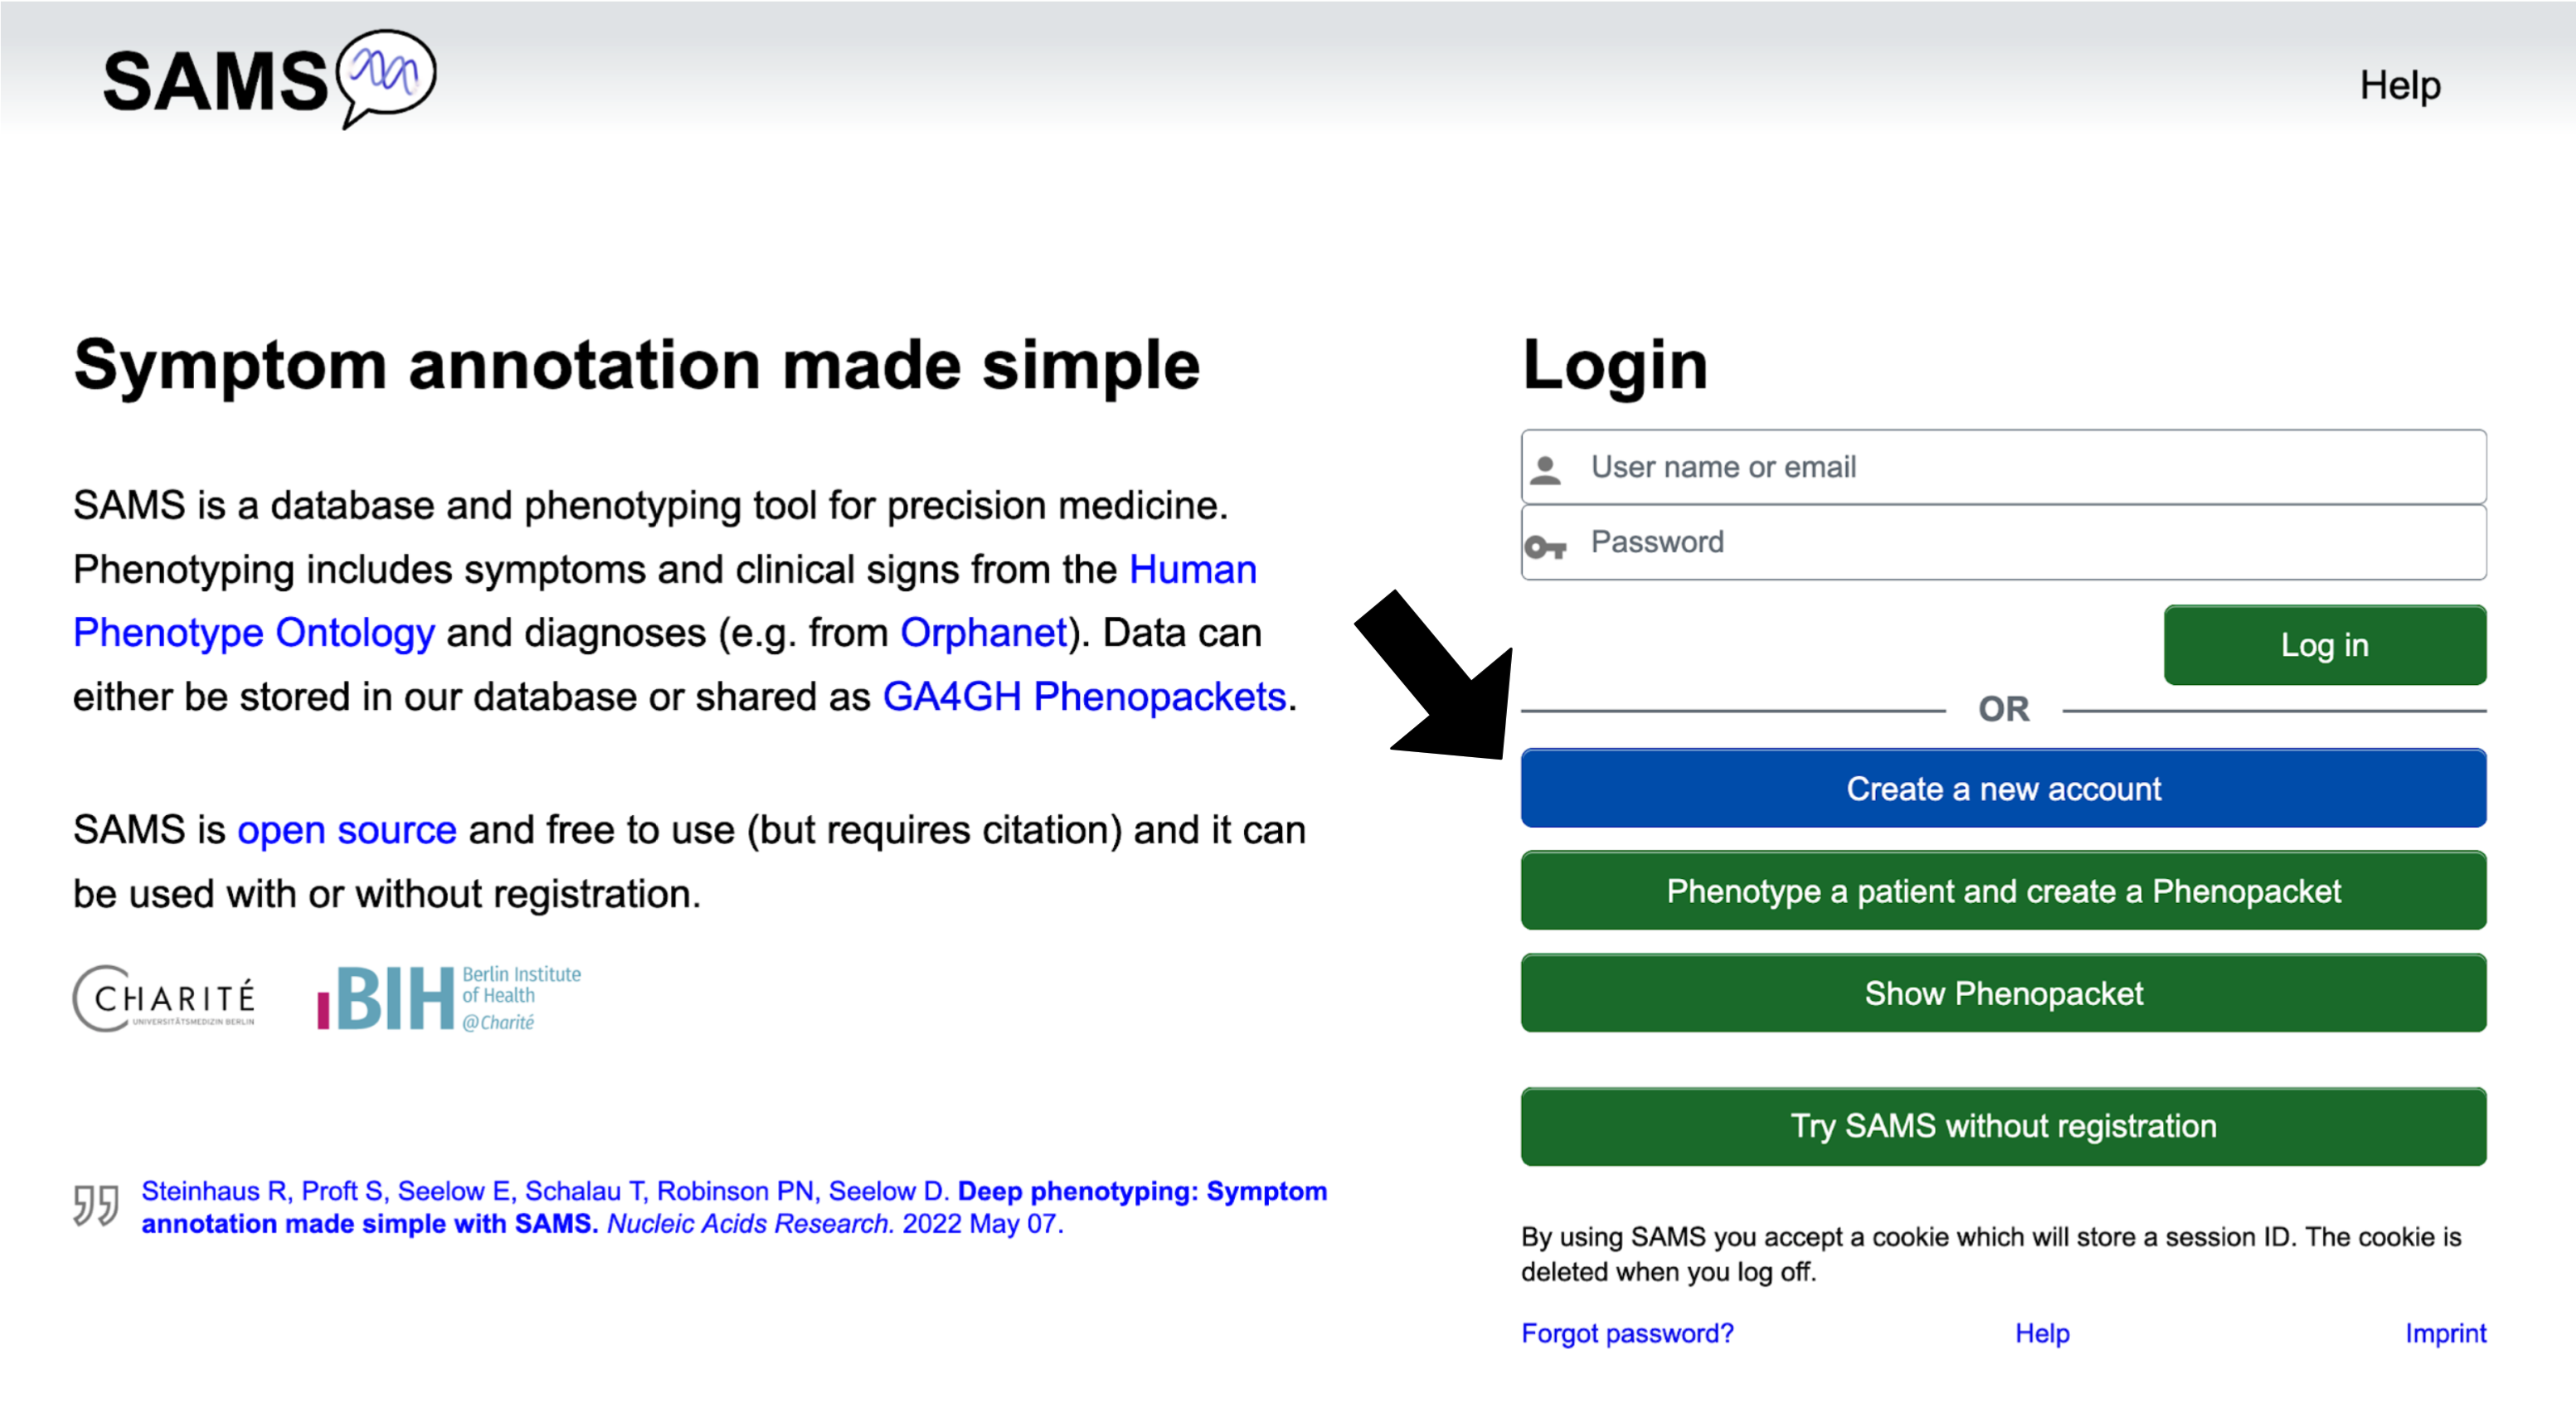
Homepage
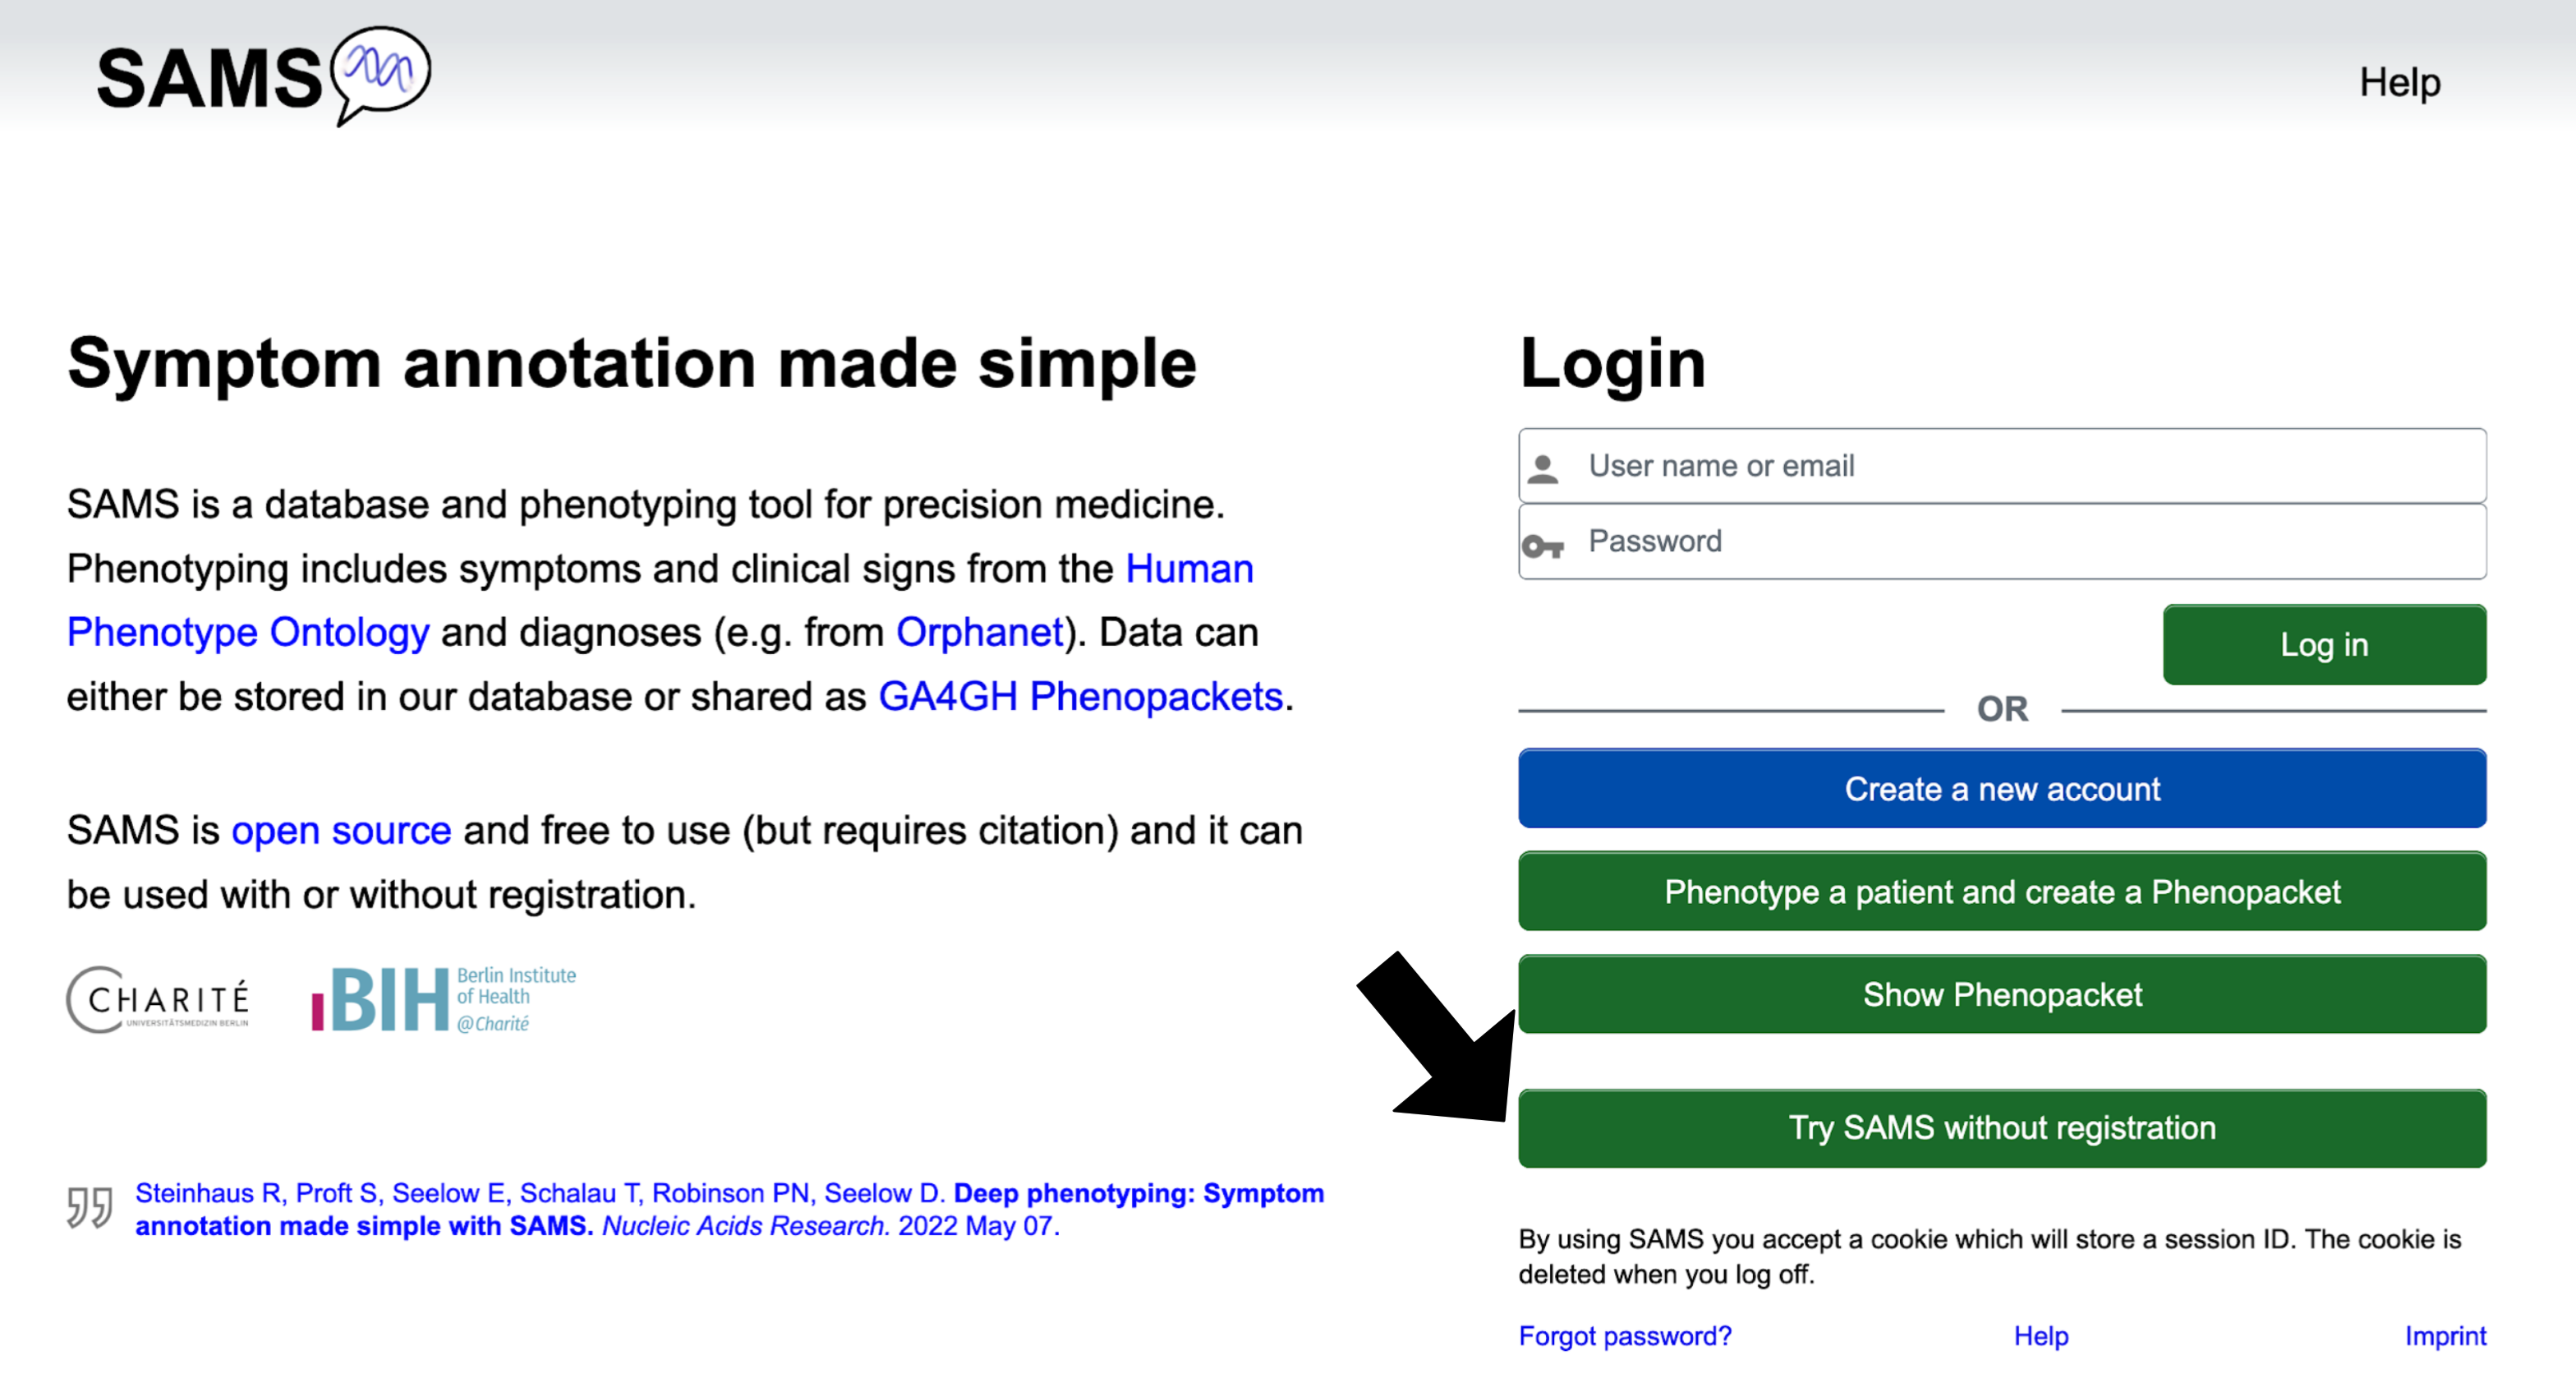
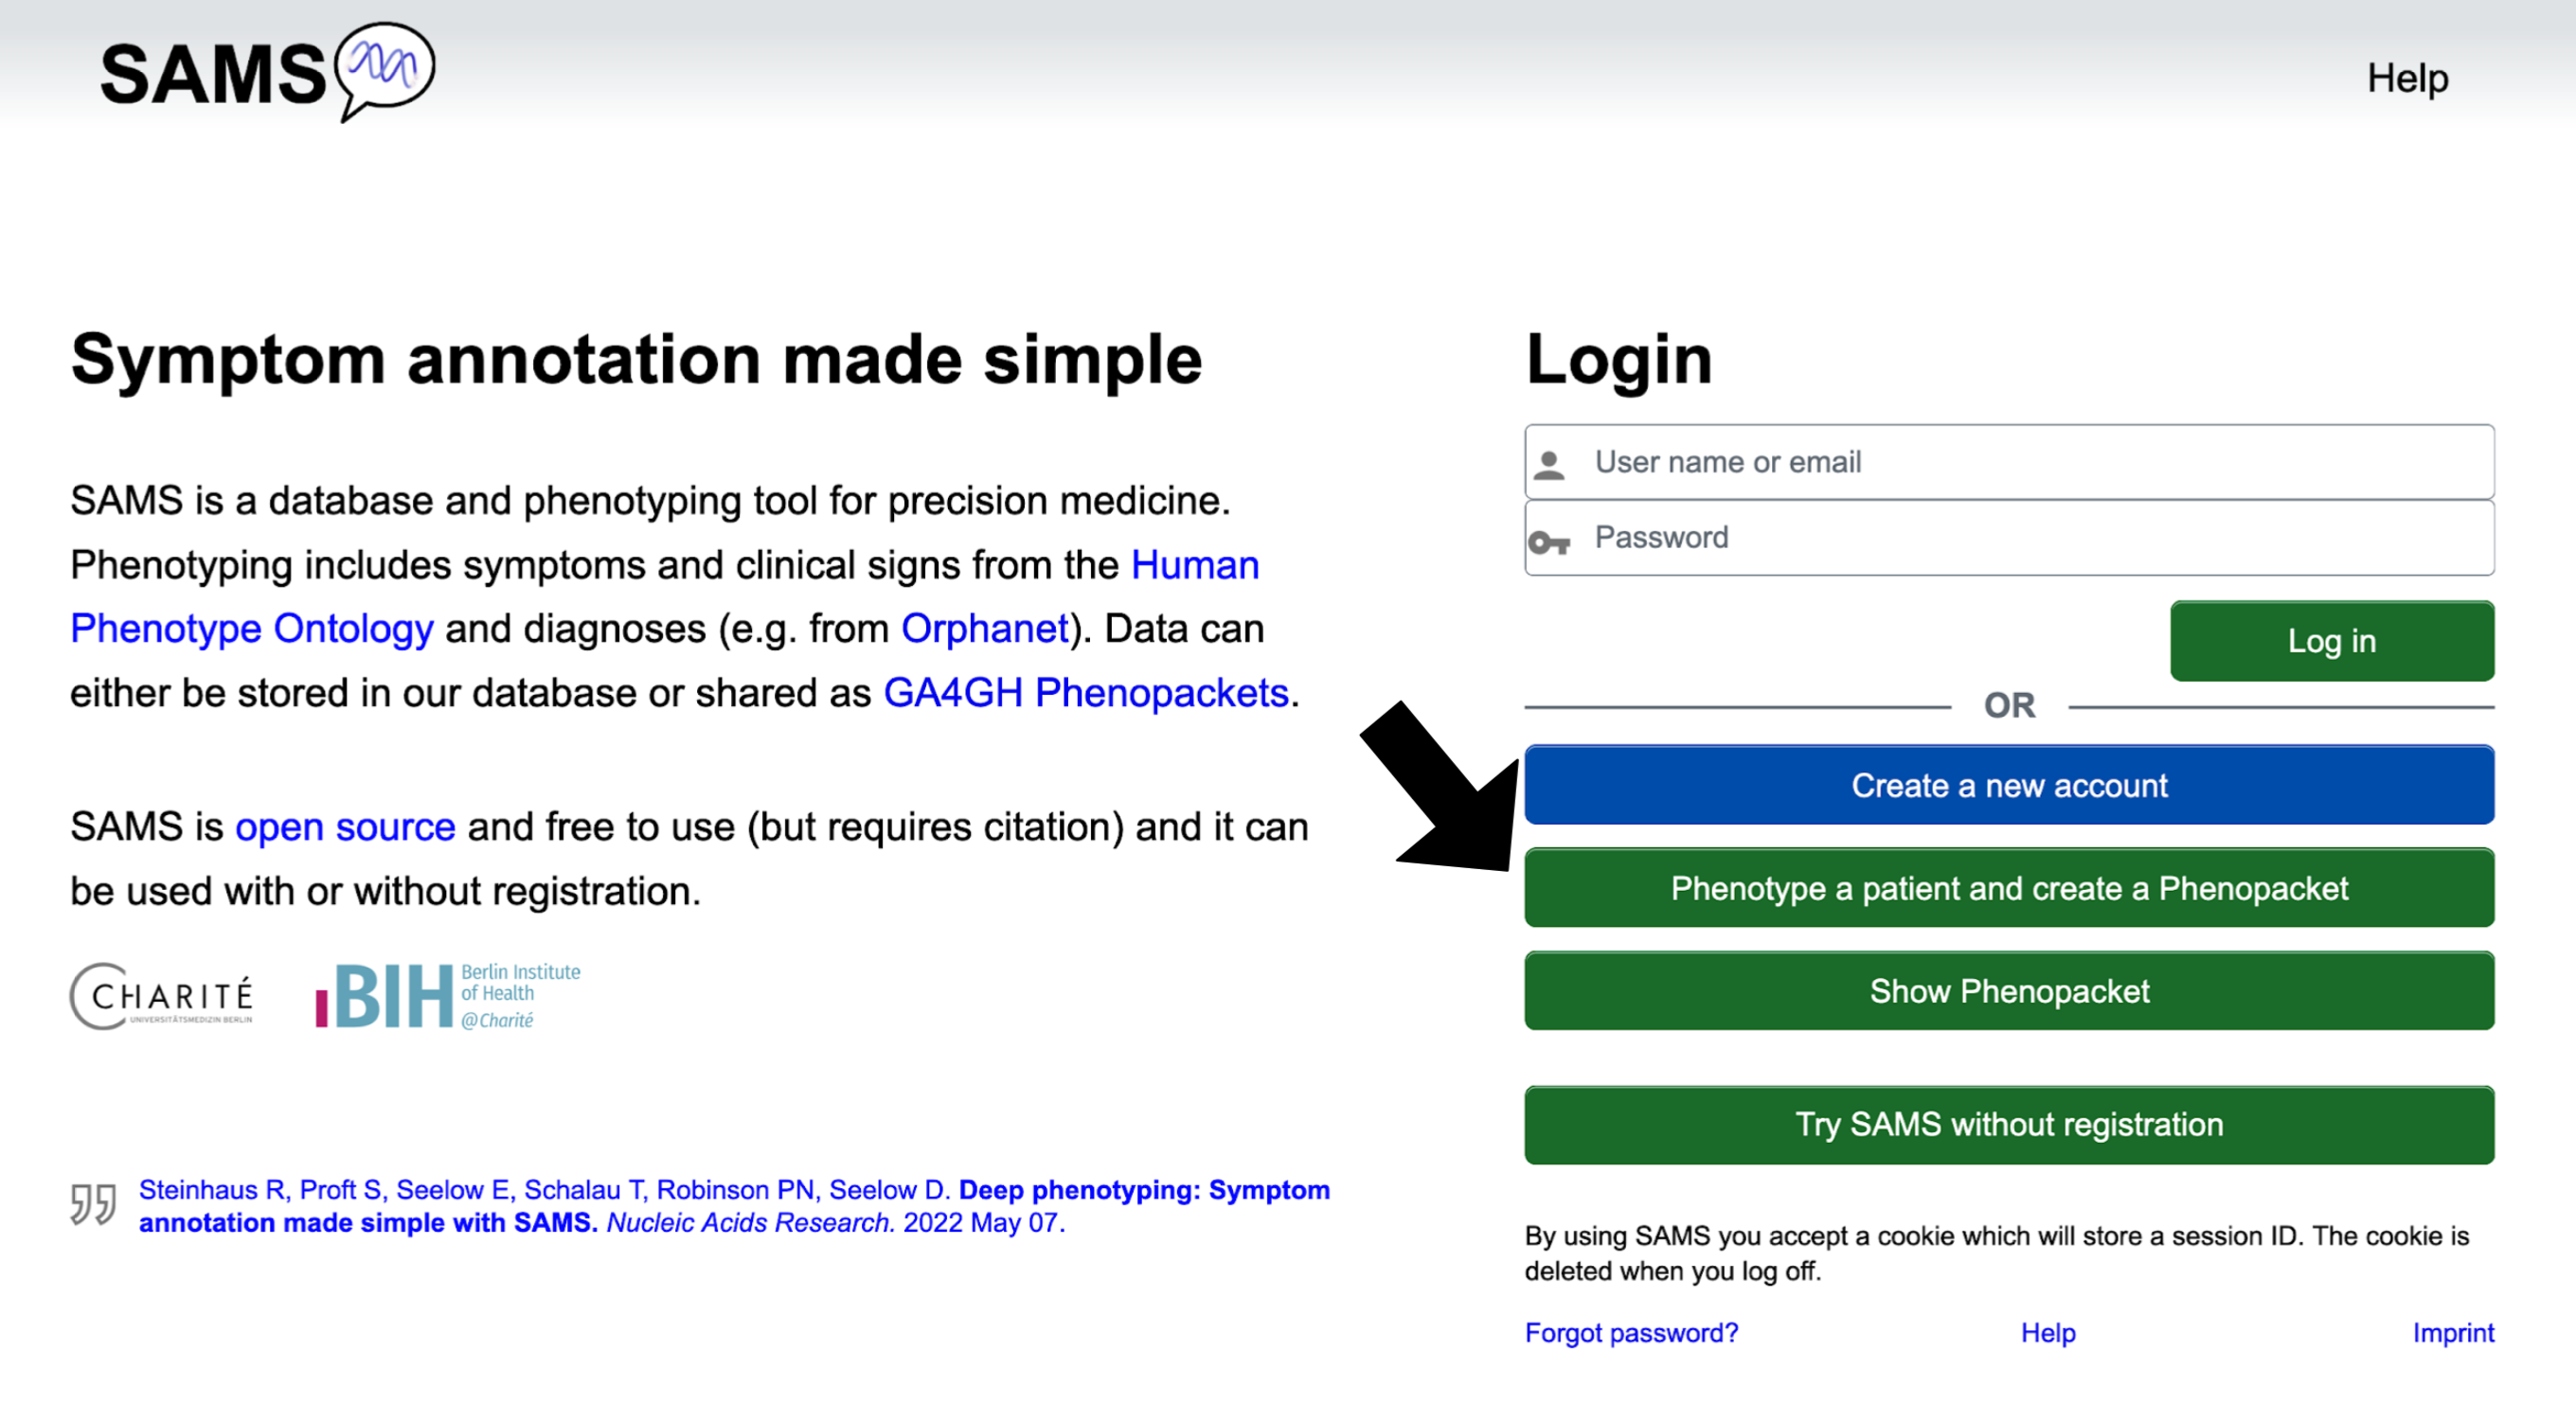
From the "Homepage" you may click on the following buttons:
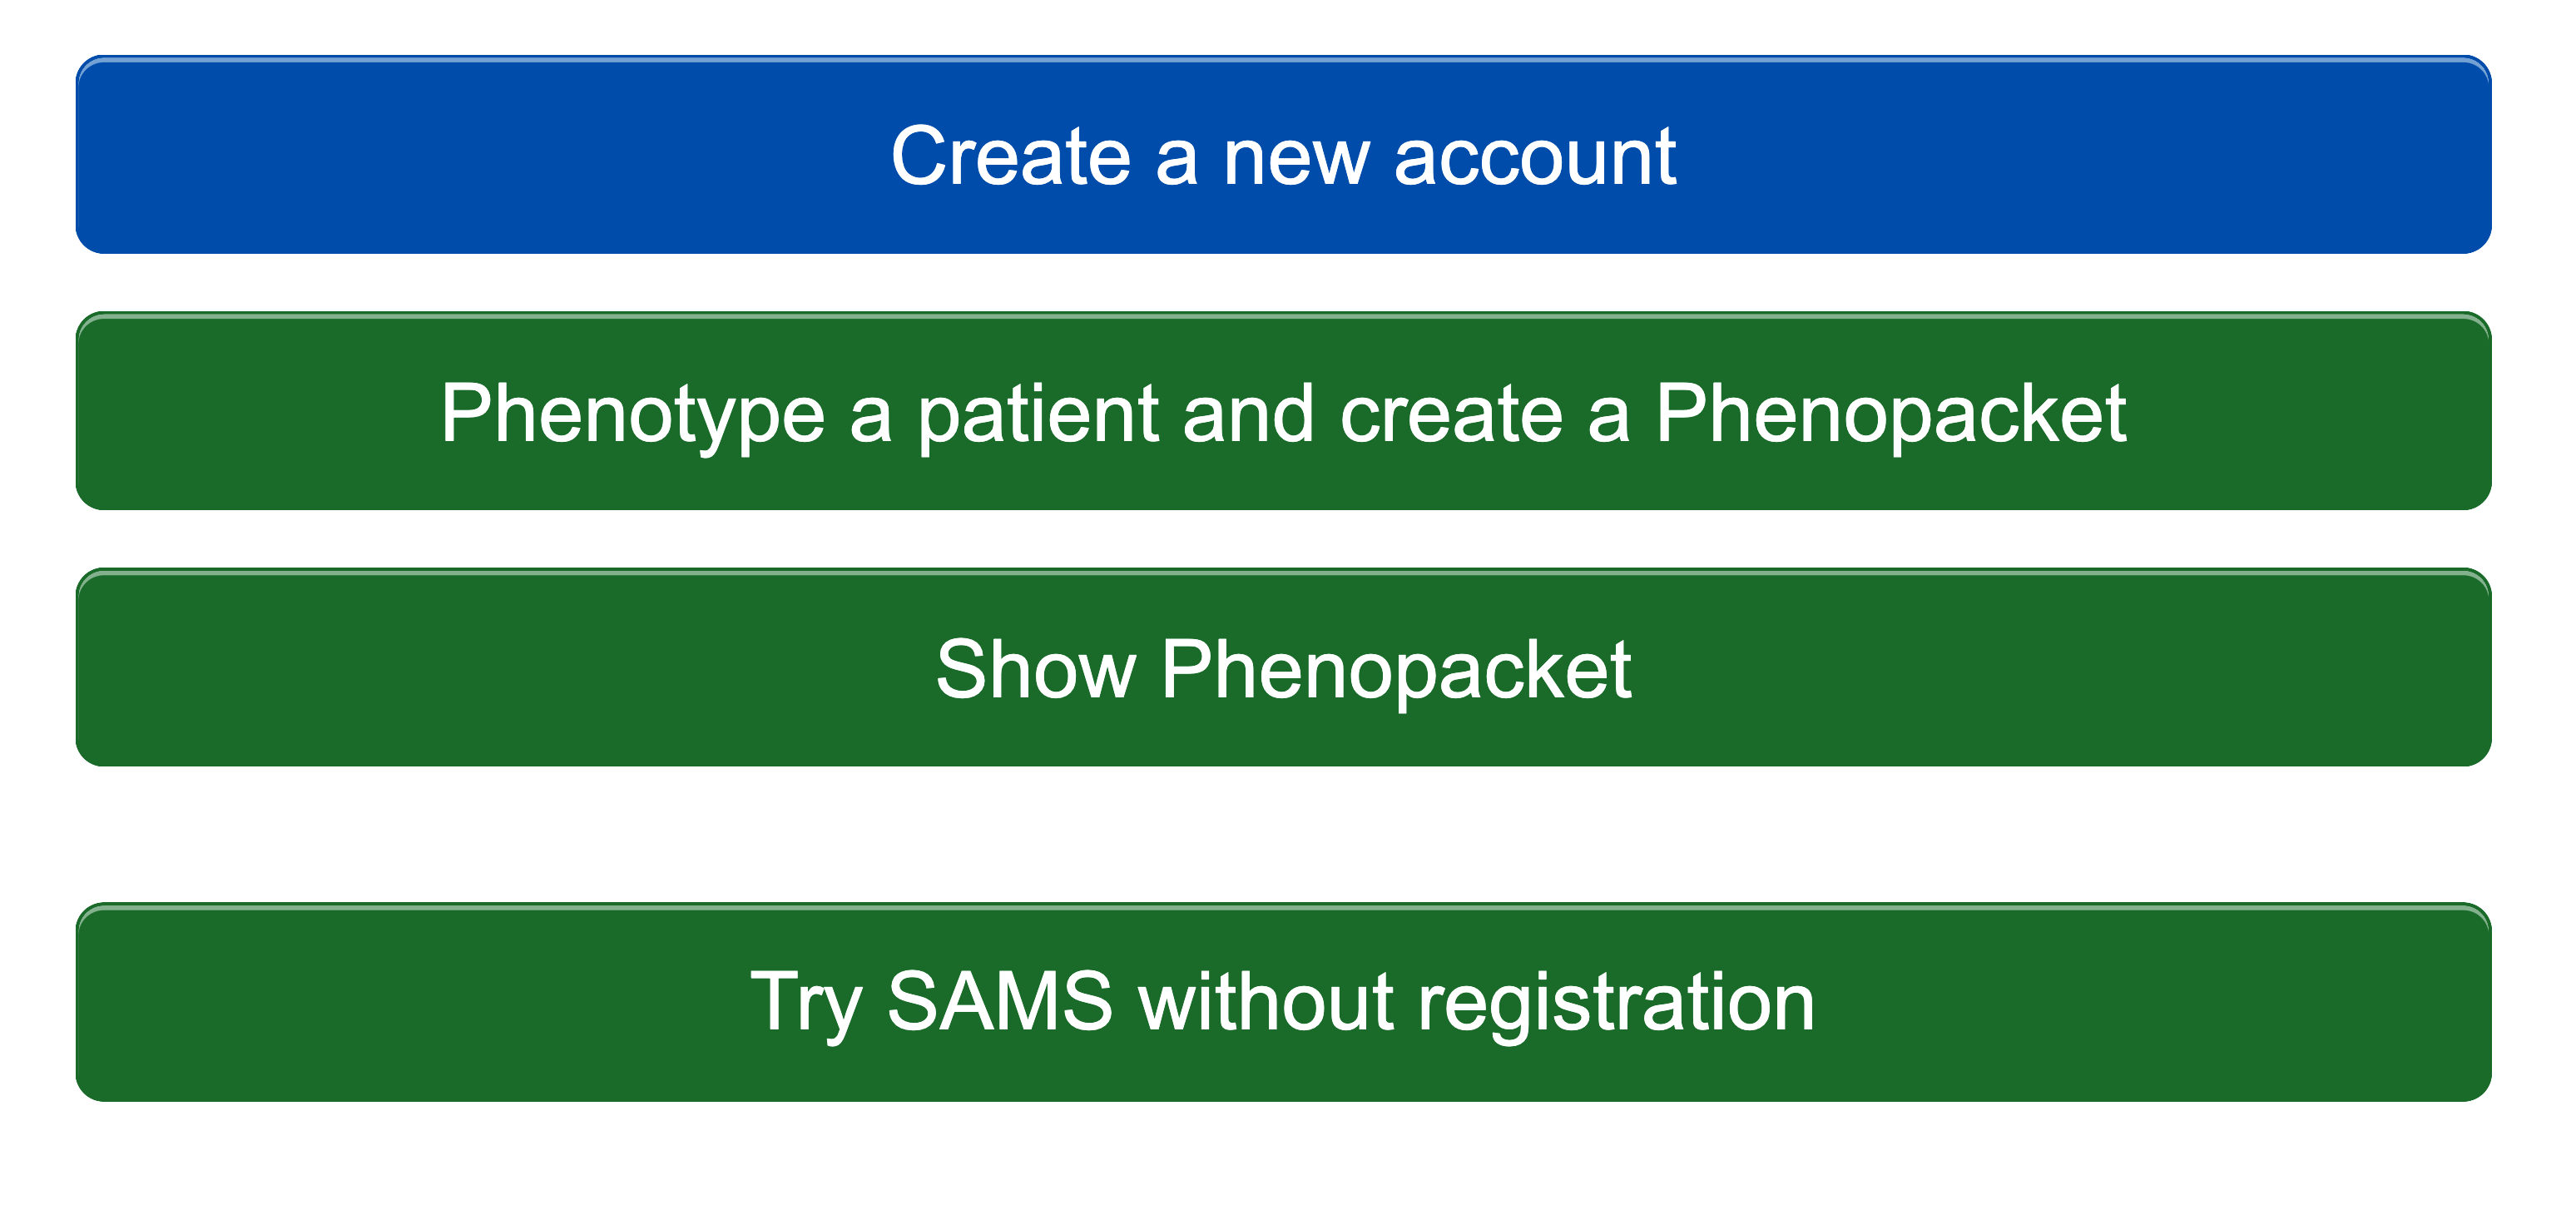
The Create a new account button allows you to create an account as a physician or patient.
Phenotype a patient and create a Phenopacket brings you to the "Enter phenotype" page, where you may report on signs and symptoms. You will be able to export the record as a GA4GH Phenopacket, but will not be able to save it to the SAMS database.
Show Phenopacket allows you to see the contents of a Phenopacket that is saved as a JSON.
Try SAMS without registration lets you try out SAMS functionalities as if you were a registered
user. For details see section Use SAMS without registration.
However, the information recorded can be viewed and edited by anyone - therefore do not record real
patient data here. If you realise you like SAMS after trying it without an account, we highly encourage
you to make one.
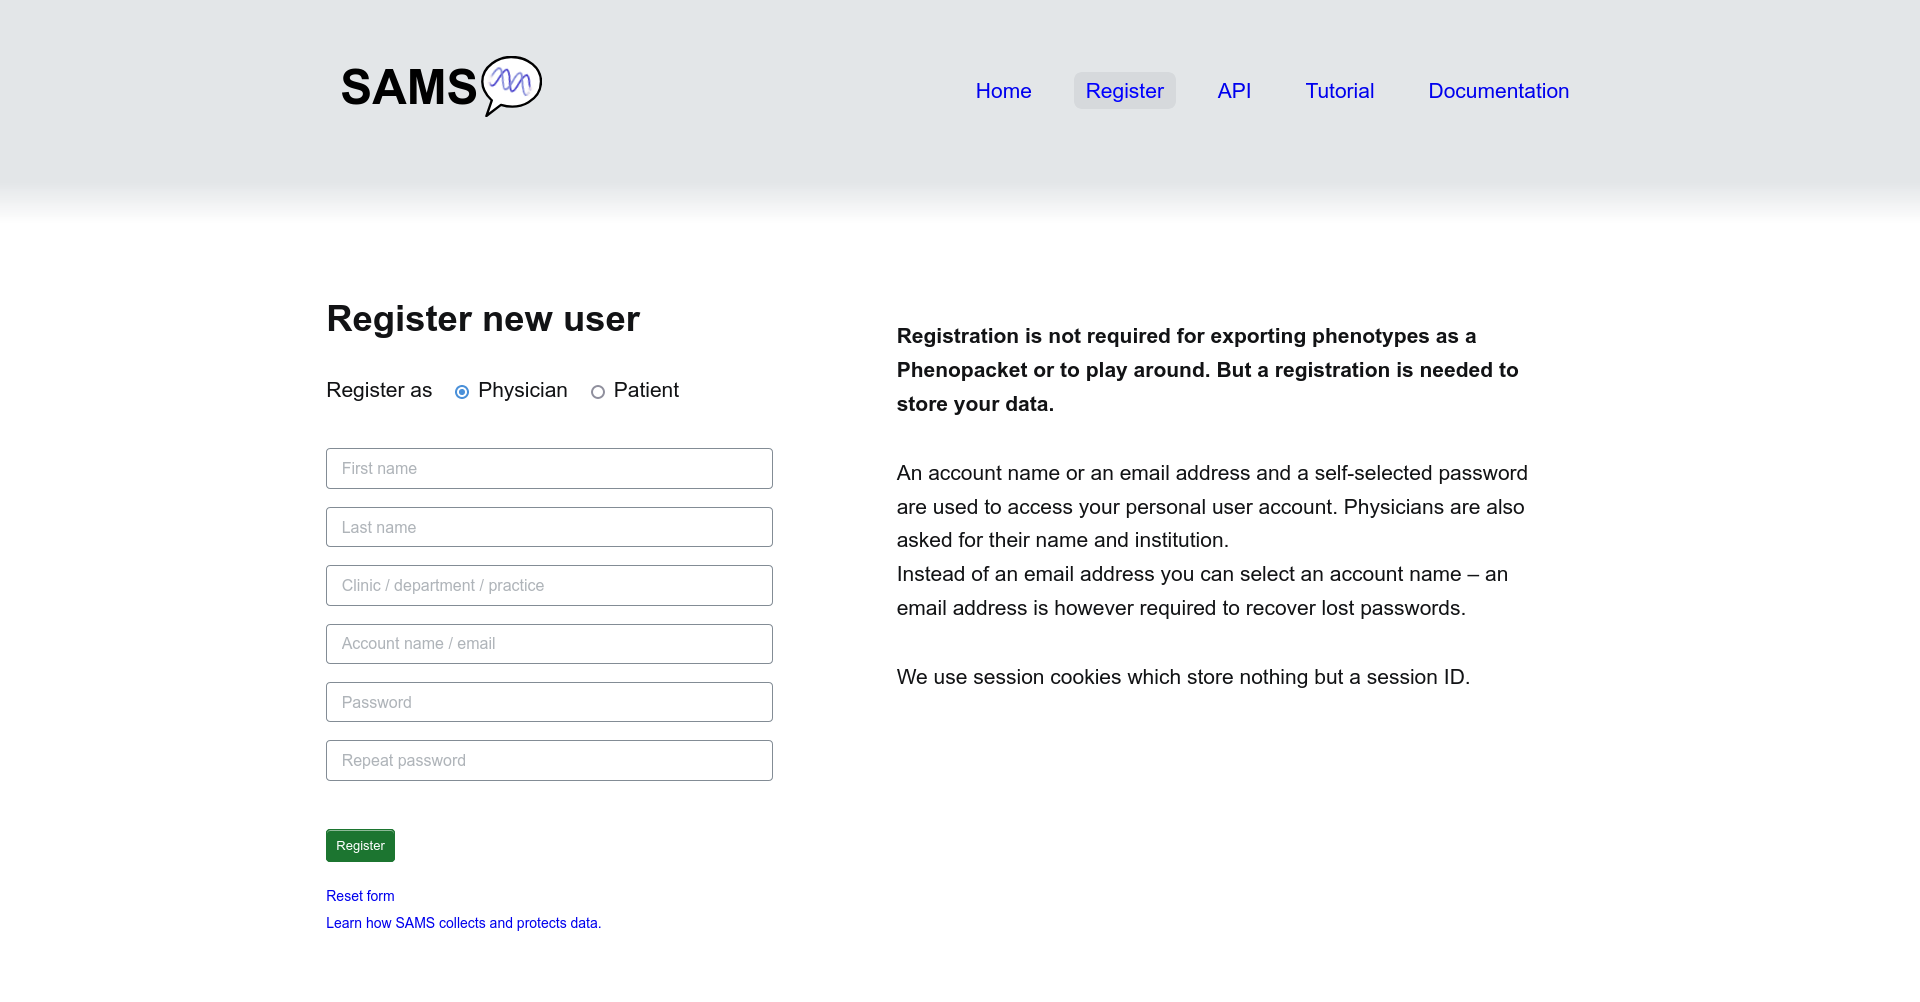
Use SAMS with registration
SAMS can be used by both physicians and patients who would like to track signs and symptoms.
Using SAMS with an account will let you save your records. Register by clicking Create a new account. For this you will need a login name. We recommend that you specify a valid email address because this is the only way to recover lost passwords. An email address, however, is not mandatory.
When you log in to SAMS, a session cookie is set – these are deleted automatically after 4 hours or when you log off.
If you forgot your password, please use the Forgot password? link.
As a physician
You may optionally enter your name and the name of your institution or practice.
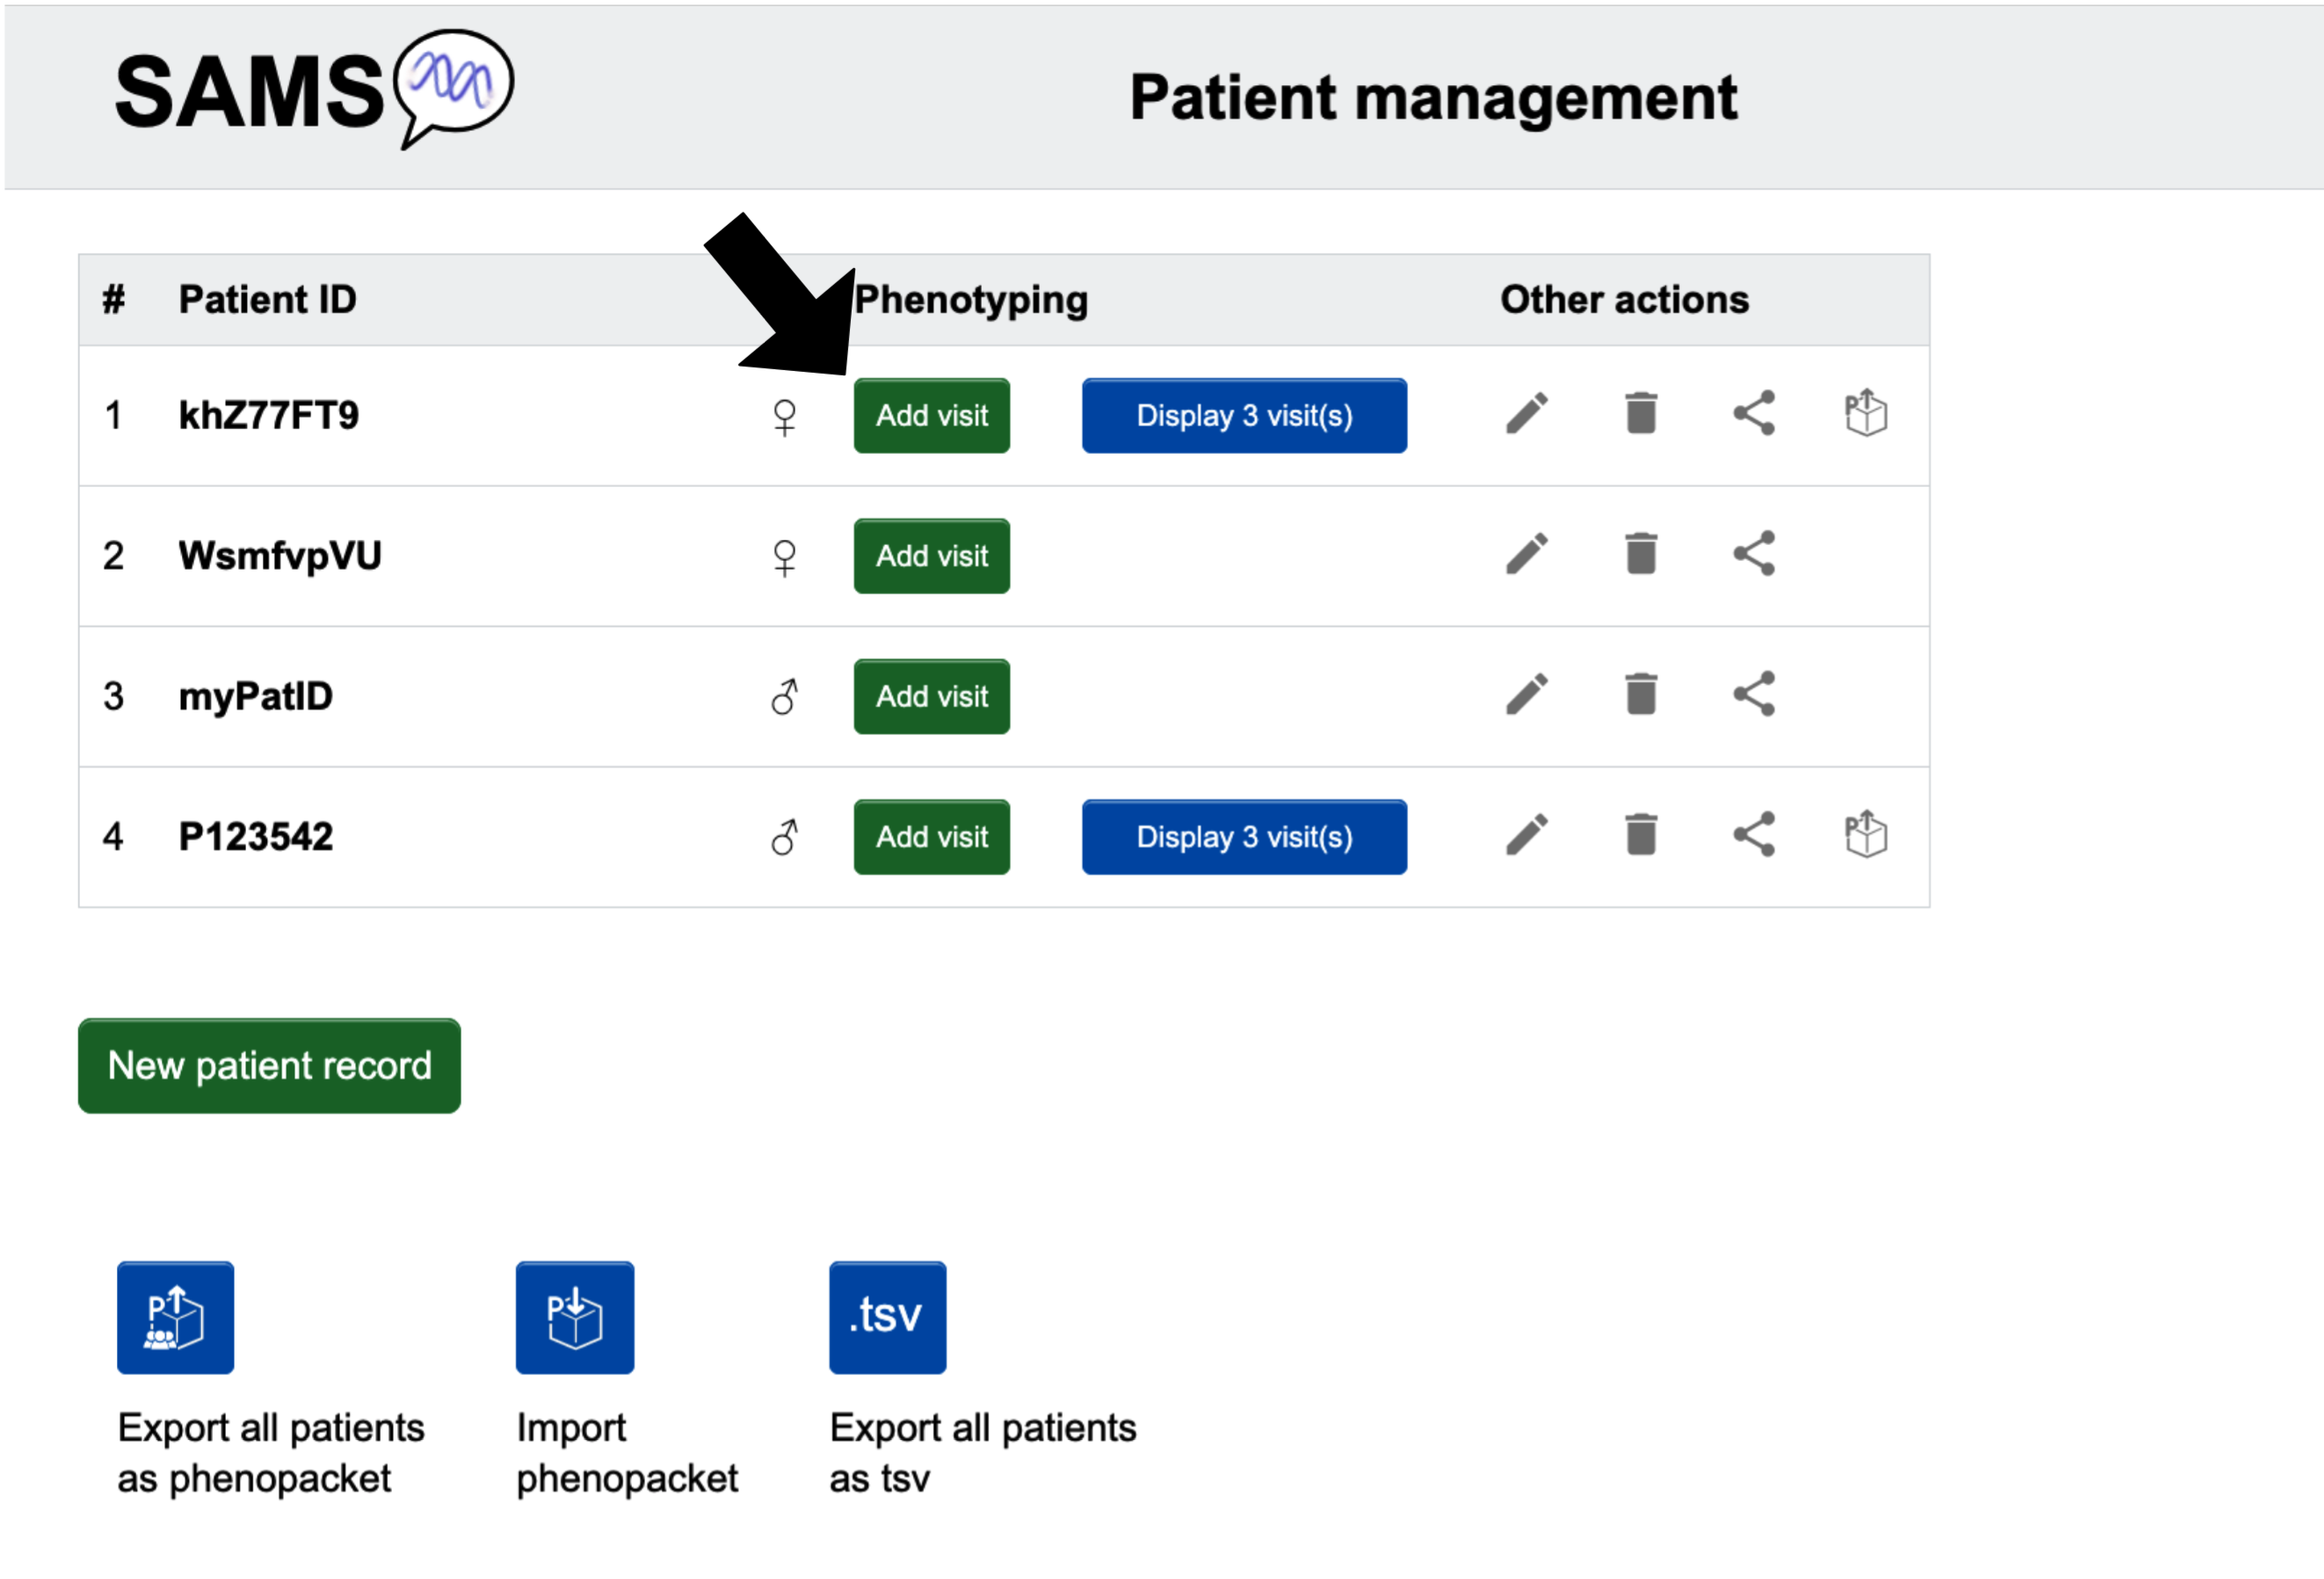
After successful login, you can access all previously entered patients. You can create new
patient profiles with New patient record and enter their phenotype on a certain date
with Add visit.
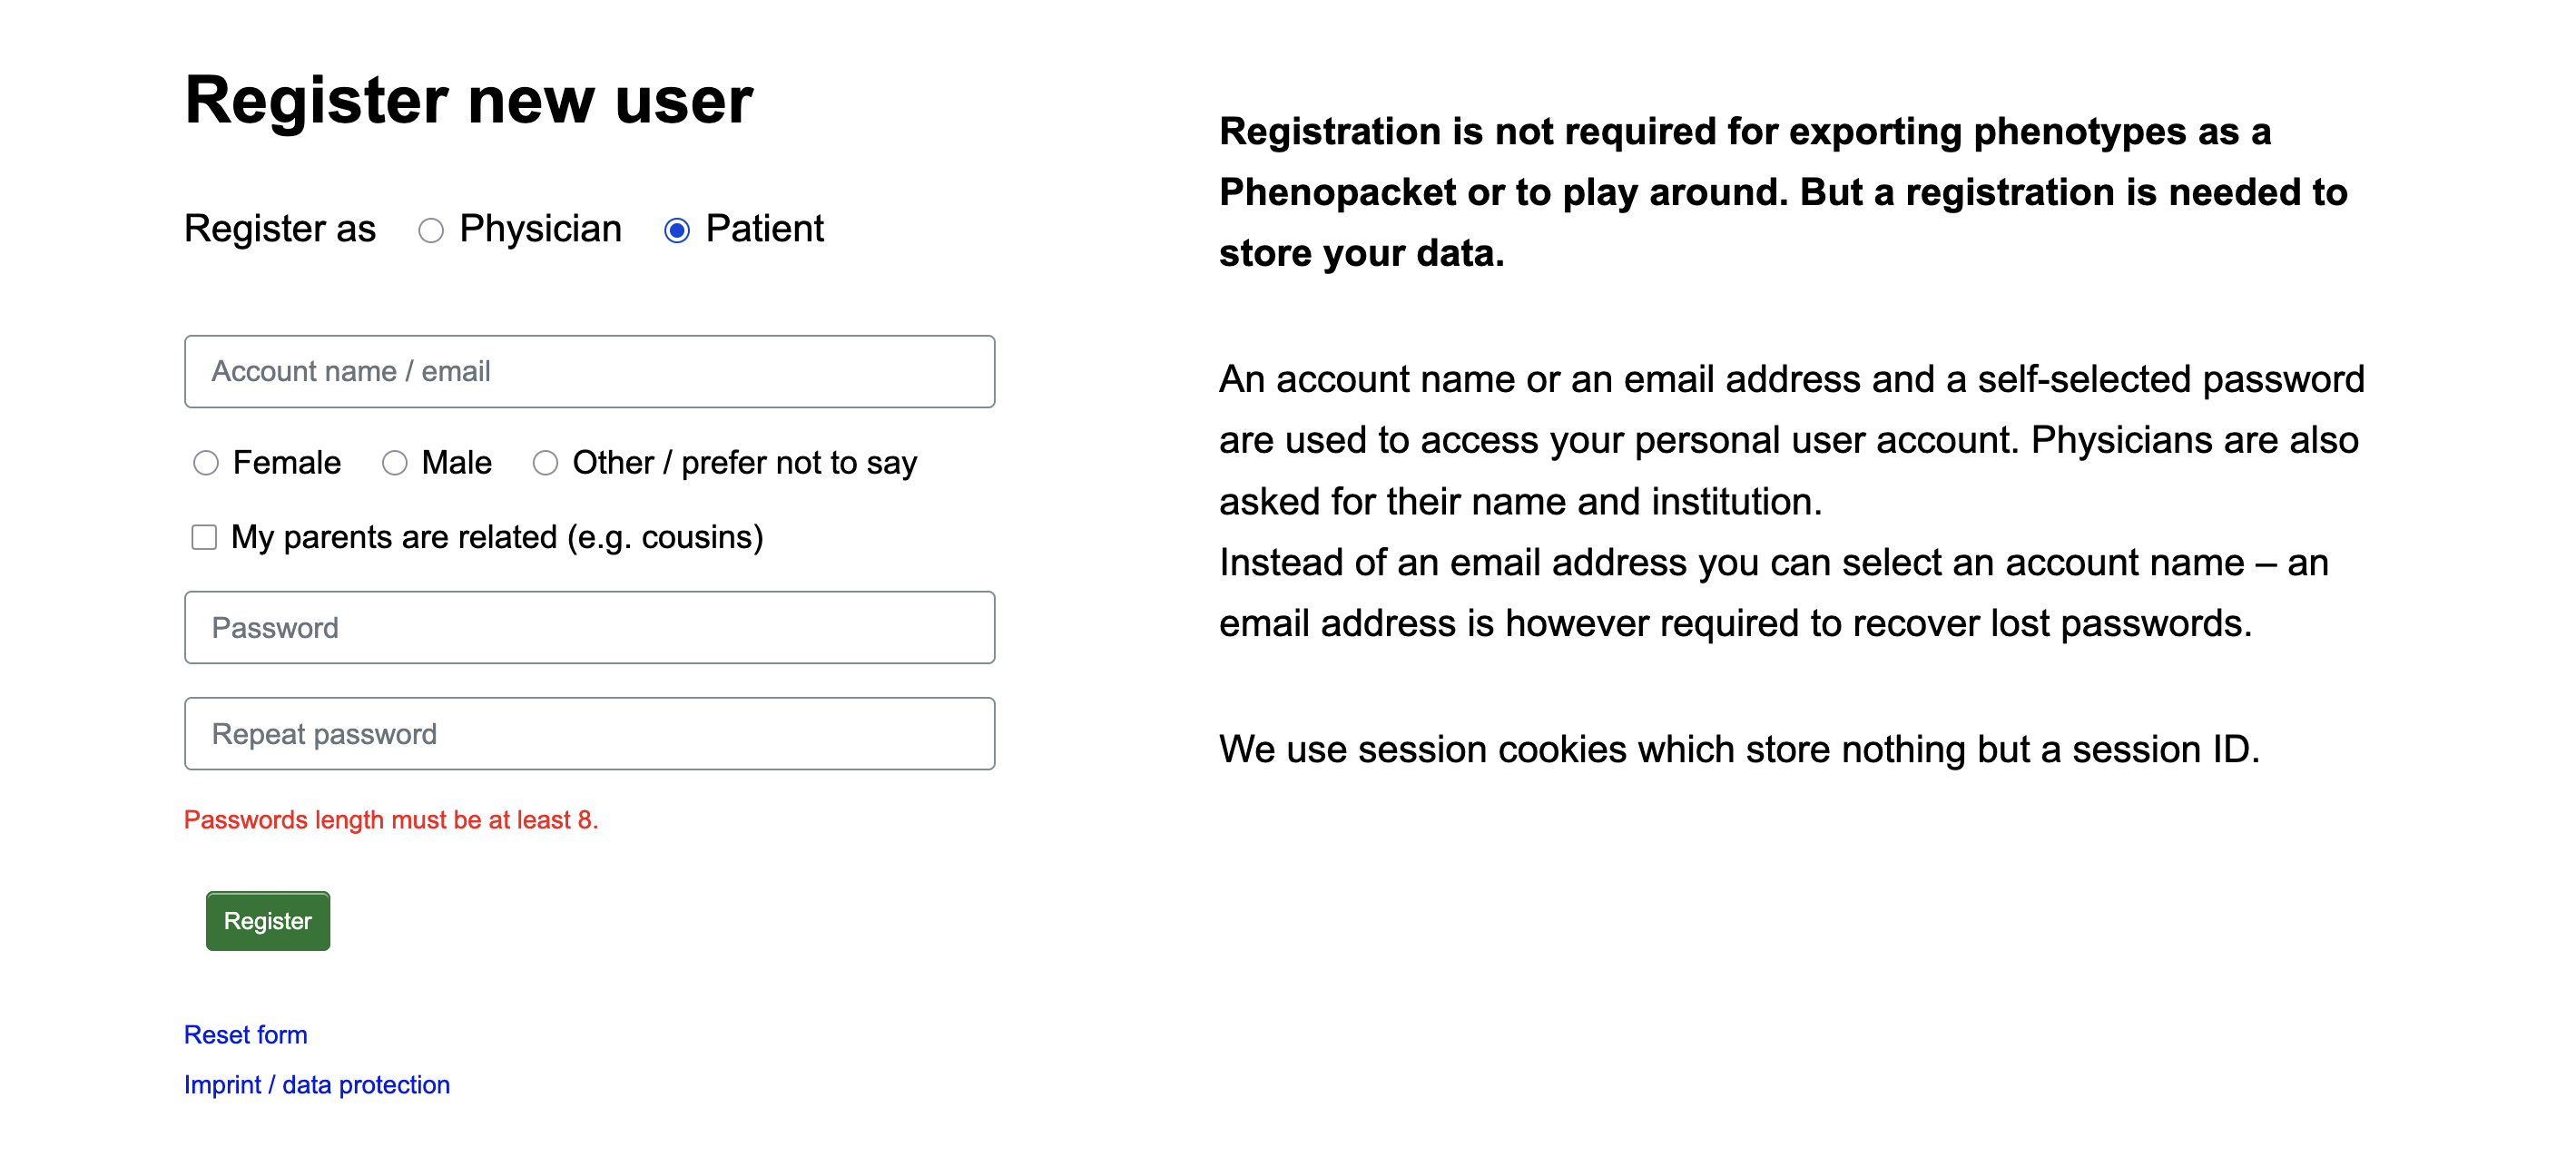
As a patient
You may track your own signs and symptoms. This can be useful as a resource to help you and your physician better understand your condition. After registration and login, you can add, modify, or delete your observed symptoms on different days.
You are encouraged to phenotype yourself (or your sick children) in collaboration with your doctors. SAMS is not a diagnostic tool: any diagnosis or decicions about therapies must be made by medical professionals.
We are working on SAMS-Pat; a new phenotyping tool for patients, which will be interconnected with SAMS. For more information, please refer to SAMS-Pat (https://www.genecascade.org/sams-pat/).
Use SAMS without registration
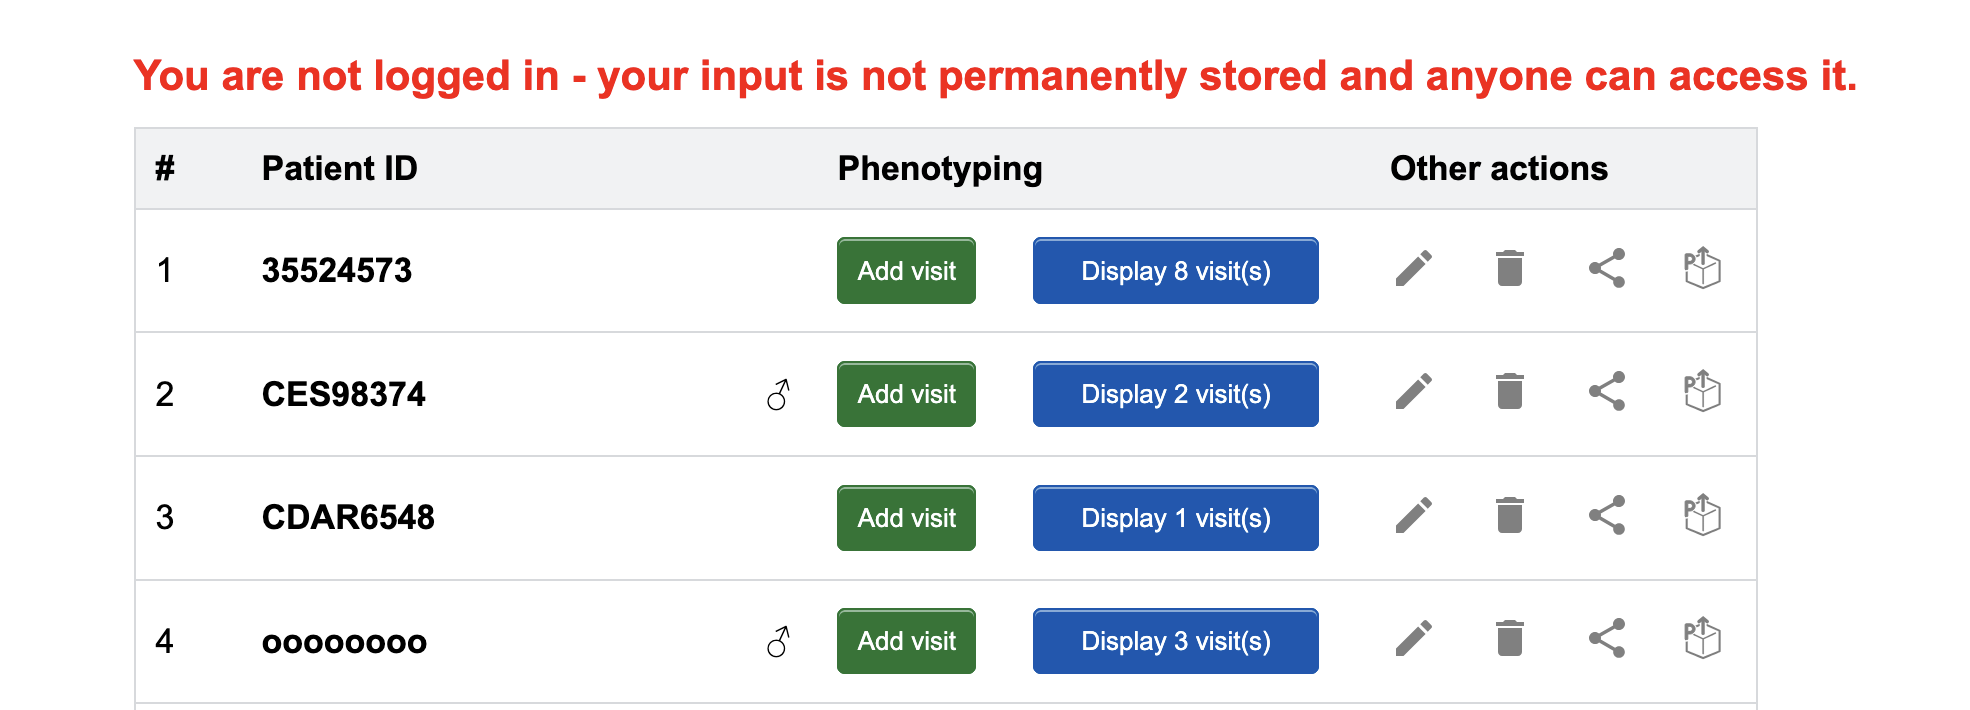
If you would like to try out SAMS before you make an account, you may do this via the Use SAMS without registration button on the "Homepage". You will be directed to a test version of the "Patient list" page, where you may access most of the functions SAMS offers as if you were logged in as a physician.
Please note that all information you enter is public and records may be deleted or modified by anyone. SAMS displays a red warning message to remind you.
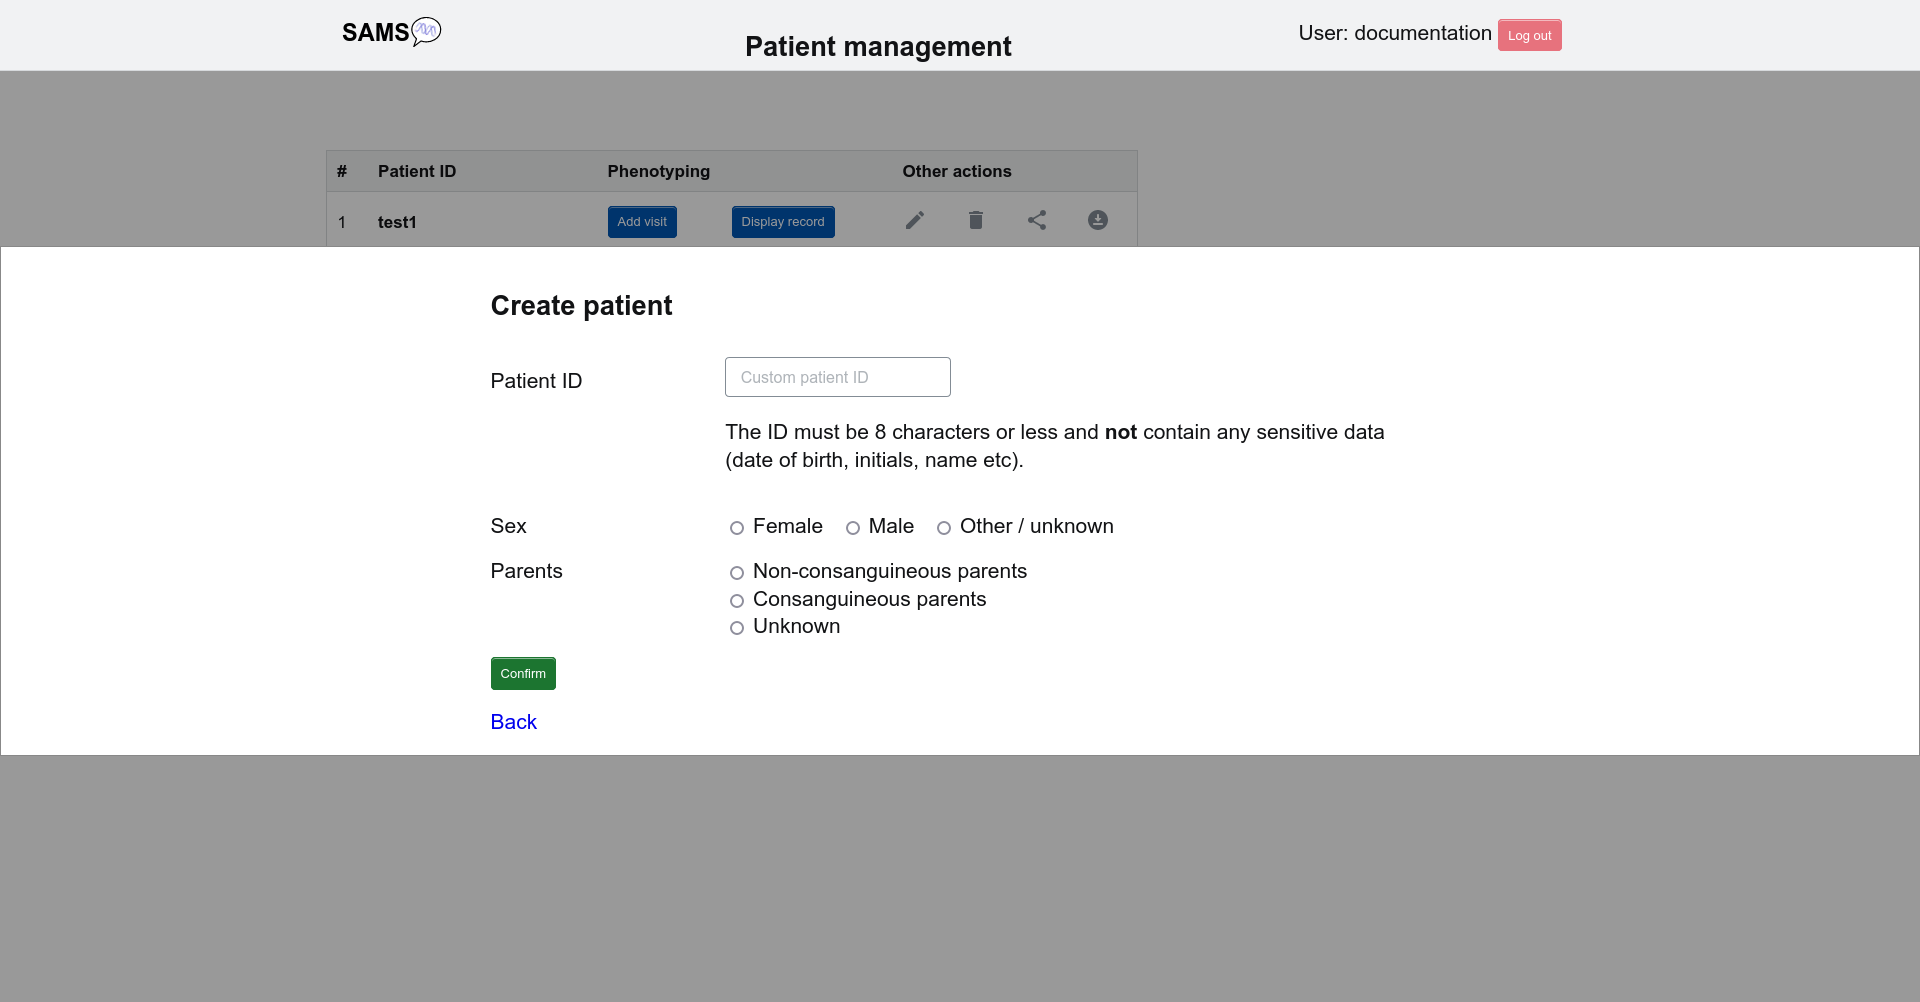
Create patient
If logged in as a physician, please click New patient record to add a new patient. Here you can enter a patient ID and set their sex and provide information of a consanguineous background.
Create phenotype
As a physician, you may either record a visit for an existing patient by clicking Add visit on the "Patient list" page when you are logged in, or you may choose to click Phenotype a patient and create a Phenopacket on the "Homepage" to export a Phenopackets of the recorded visit, if you do not wish to log in.
With login:
Without login:
On the other hand, patients are redirected here directly after login.
Add phenotypic data
On the “Enter phenotype” page, you are able to enter clinical signs, symptoms, diagnoses, and more that
were observed
during an examination.
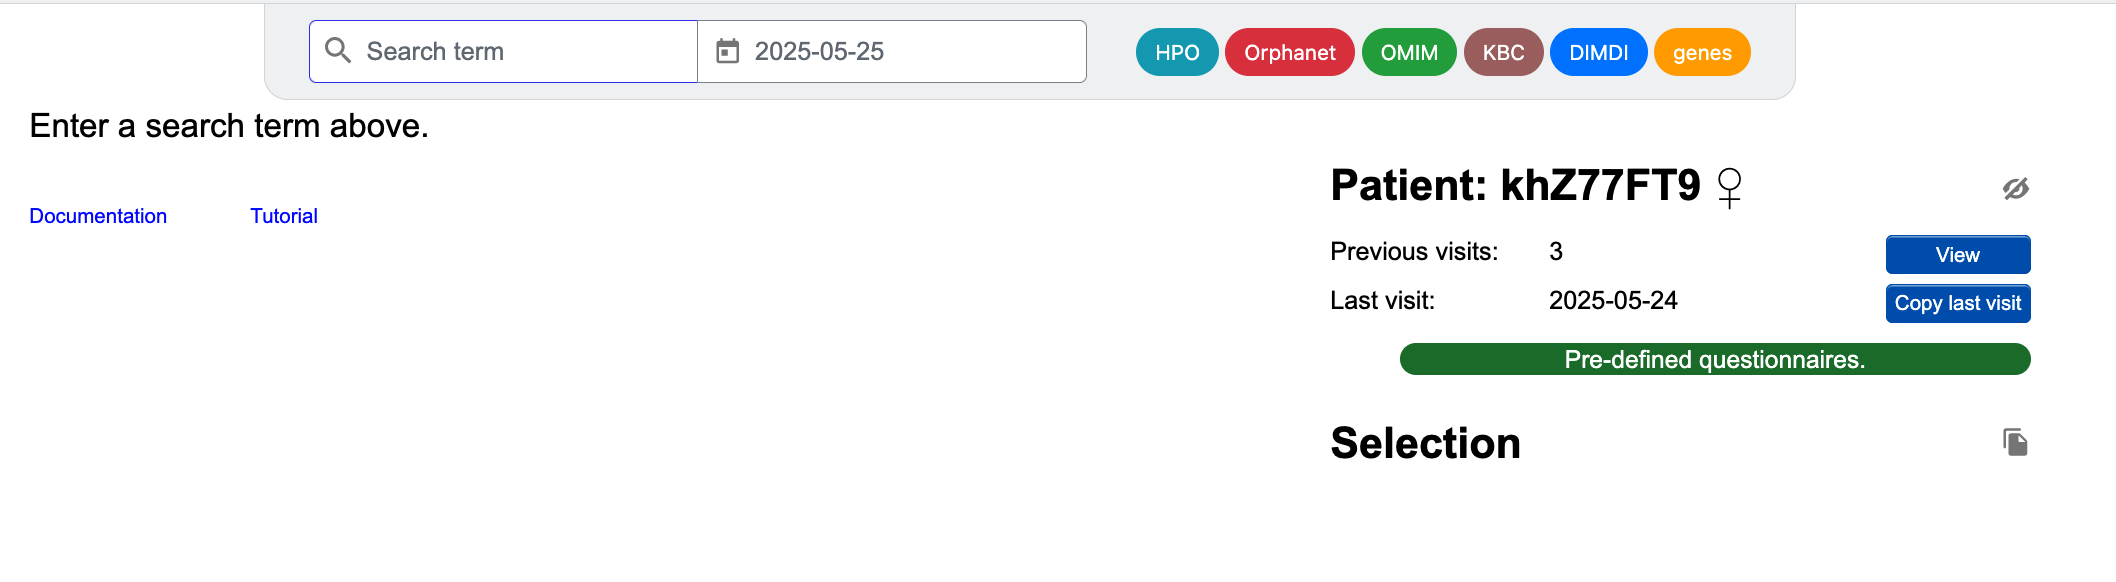
First, set the date of the visit and start by searching for a term (this might
be a symptom, a
clinical finding, or even a diagnosis) using the search bar at the top. A list will appear where you can
select the appropriate term from a list of possible matches.
The coloured items in the top right allow you to select the data sources that you wish to include (e.g.
signs and symptoms from Human Phenotype Ontology and diagnoses from Orphanet).
It is also possible to search for terms by their ID (e.g. HP:0100758).
The annotation systems included in a search query include:
| Annotation system | Content findable in SAMS |
|---|---|
| Human Phenotype Ontology (HPO) | quasi-standard, standardised vocabulary for researching and noting (rare disease) patient phenotypes through a hierarchical tree like structure |
| Orphanet | rare disease database, containing codes for known rare diseases |
| Online Mendelian Inheritance in Man (OMIM) | phenotypes linked to genetic inheritance patterns |
| Kidney Biopsy Codes for pathologists (KBC) | hierarchical database of terminology and codes applicable to non-neoplastic kidney biopsies |
| Deutsches Institute für Medizinische Dokumentation und Information(DIMDI) | German rare disease database reporting diseases as Alpha-IDs (Outdated) |
| National Center for Biotechnology Information genes | database of known genes |
Note that the version of each annotation system currently used in SAMS can be found here.
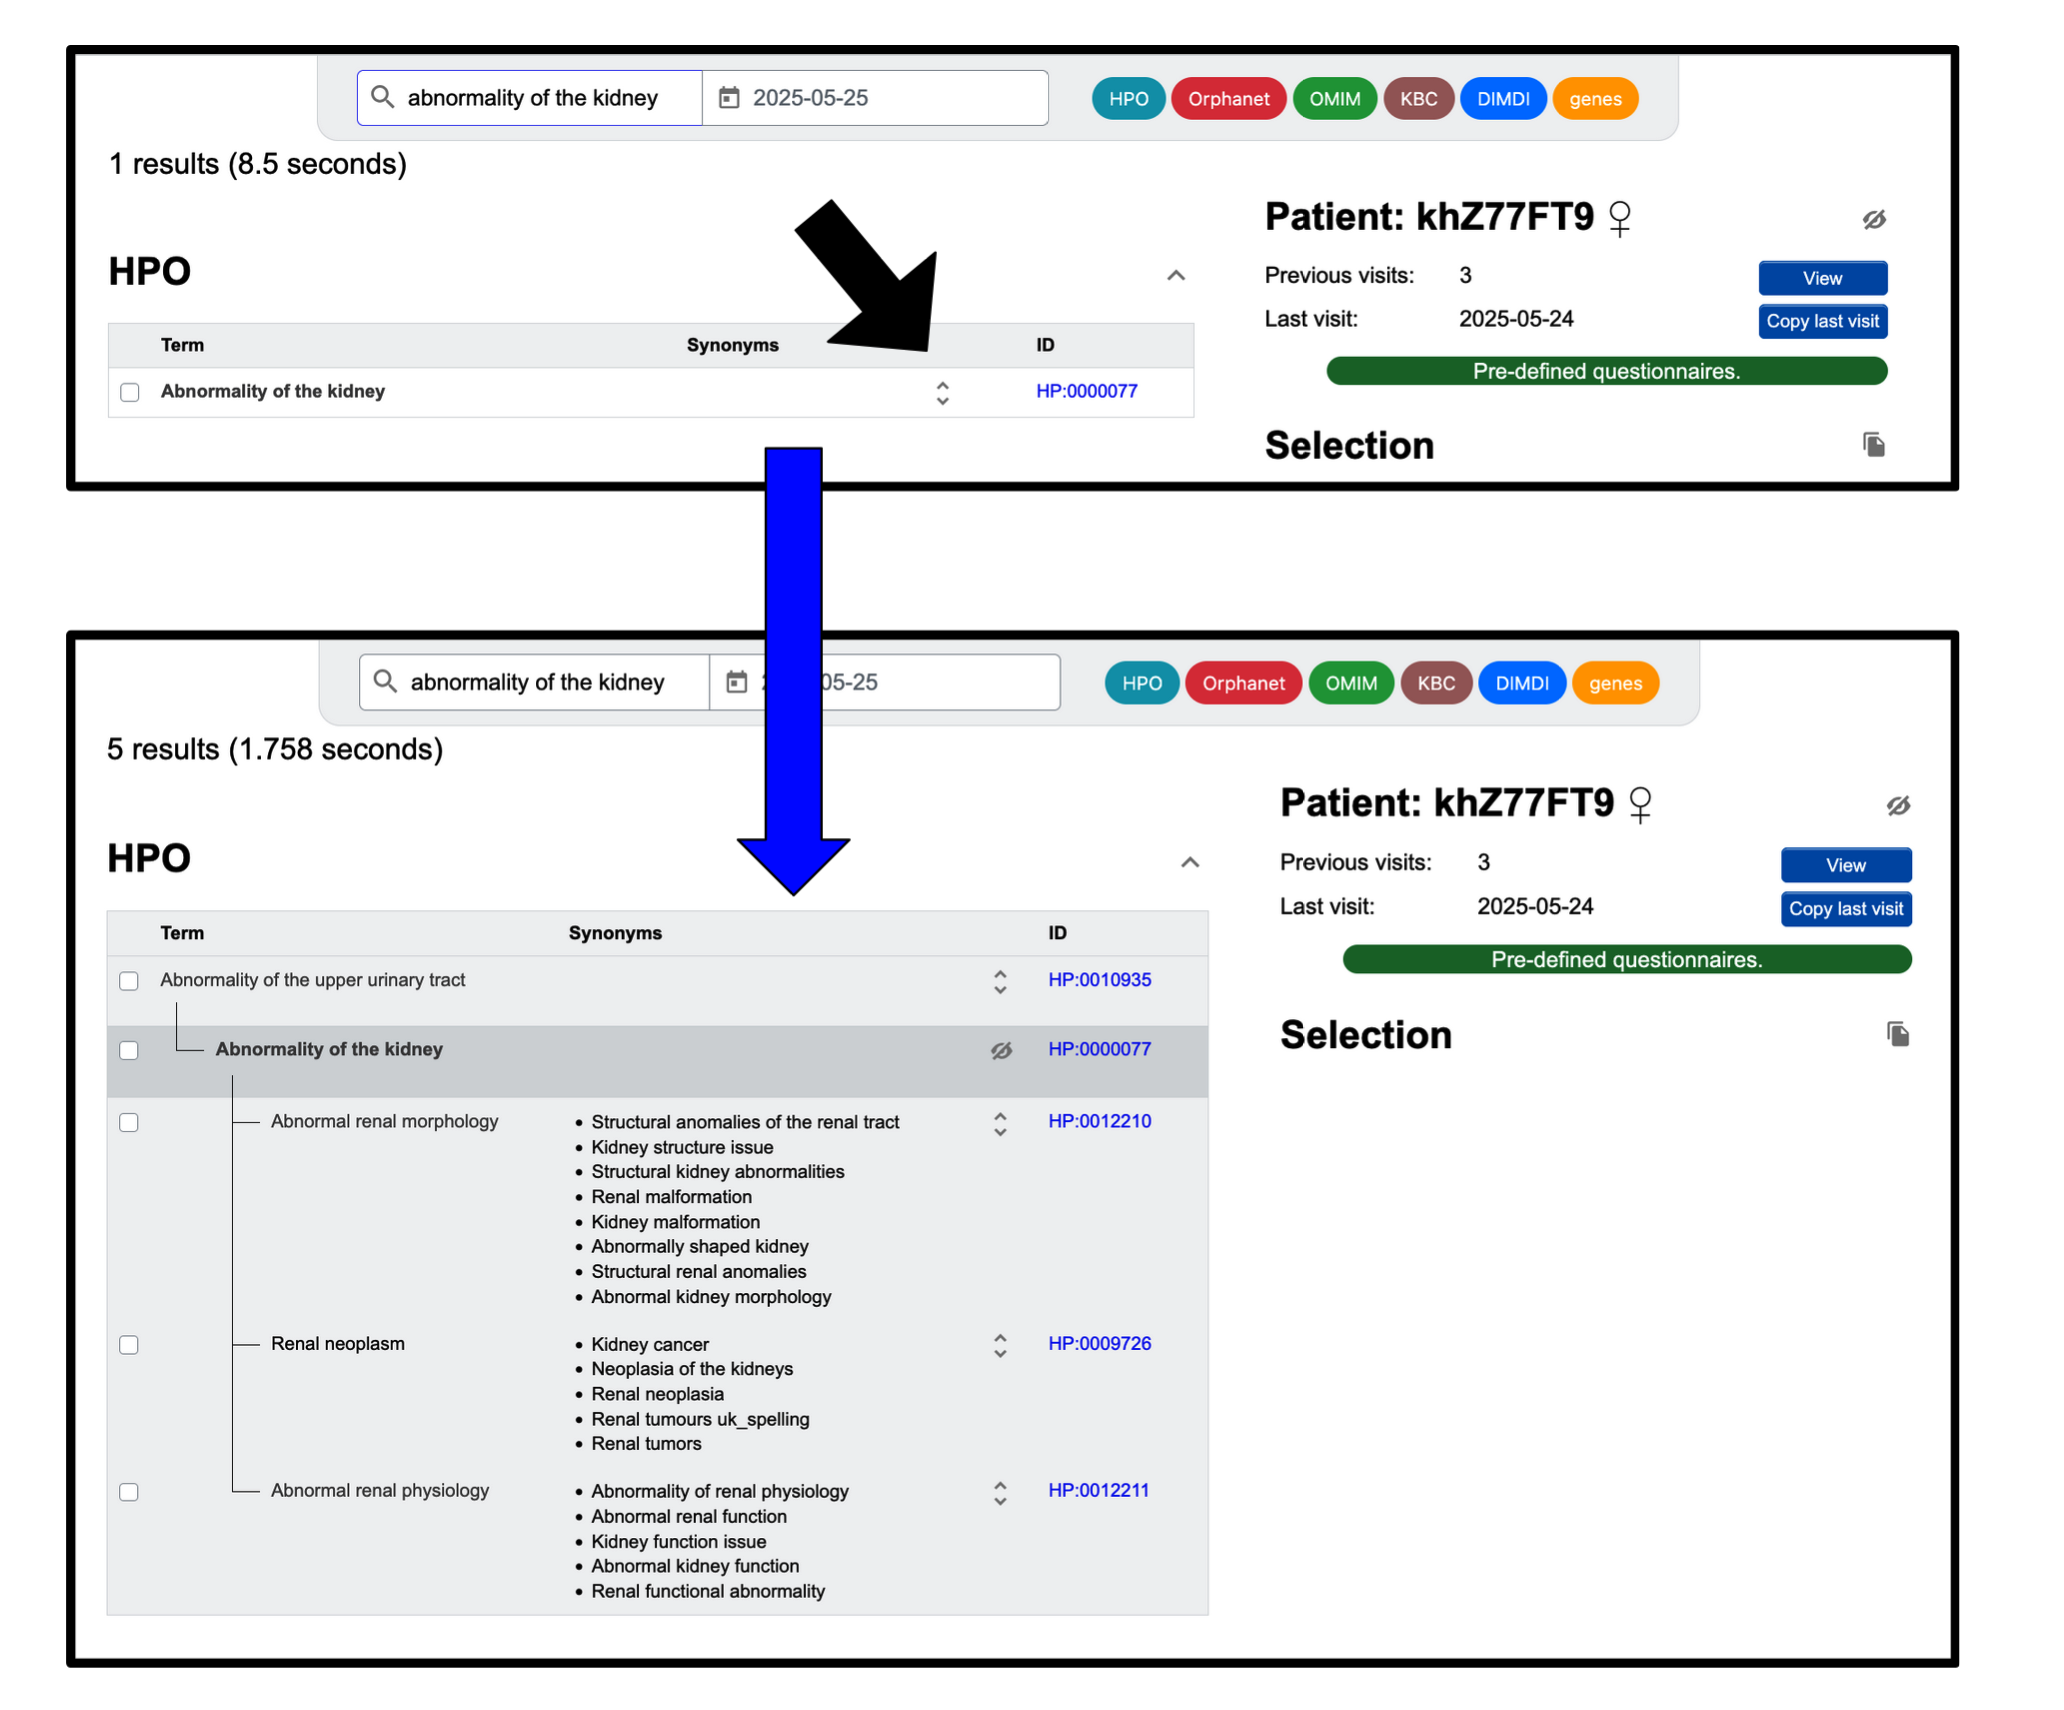
If the term is from a hierarchical data source (e.g. the Human Phenotype Ontology), you can browse through the tree. Clicking the up and down arrows will trigger a parent-child category display, where you can select the appropriate terms.
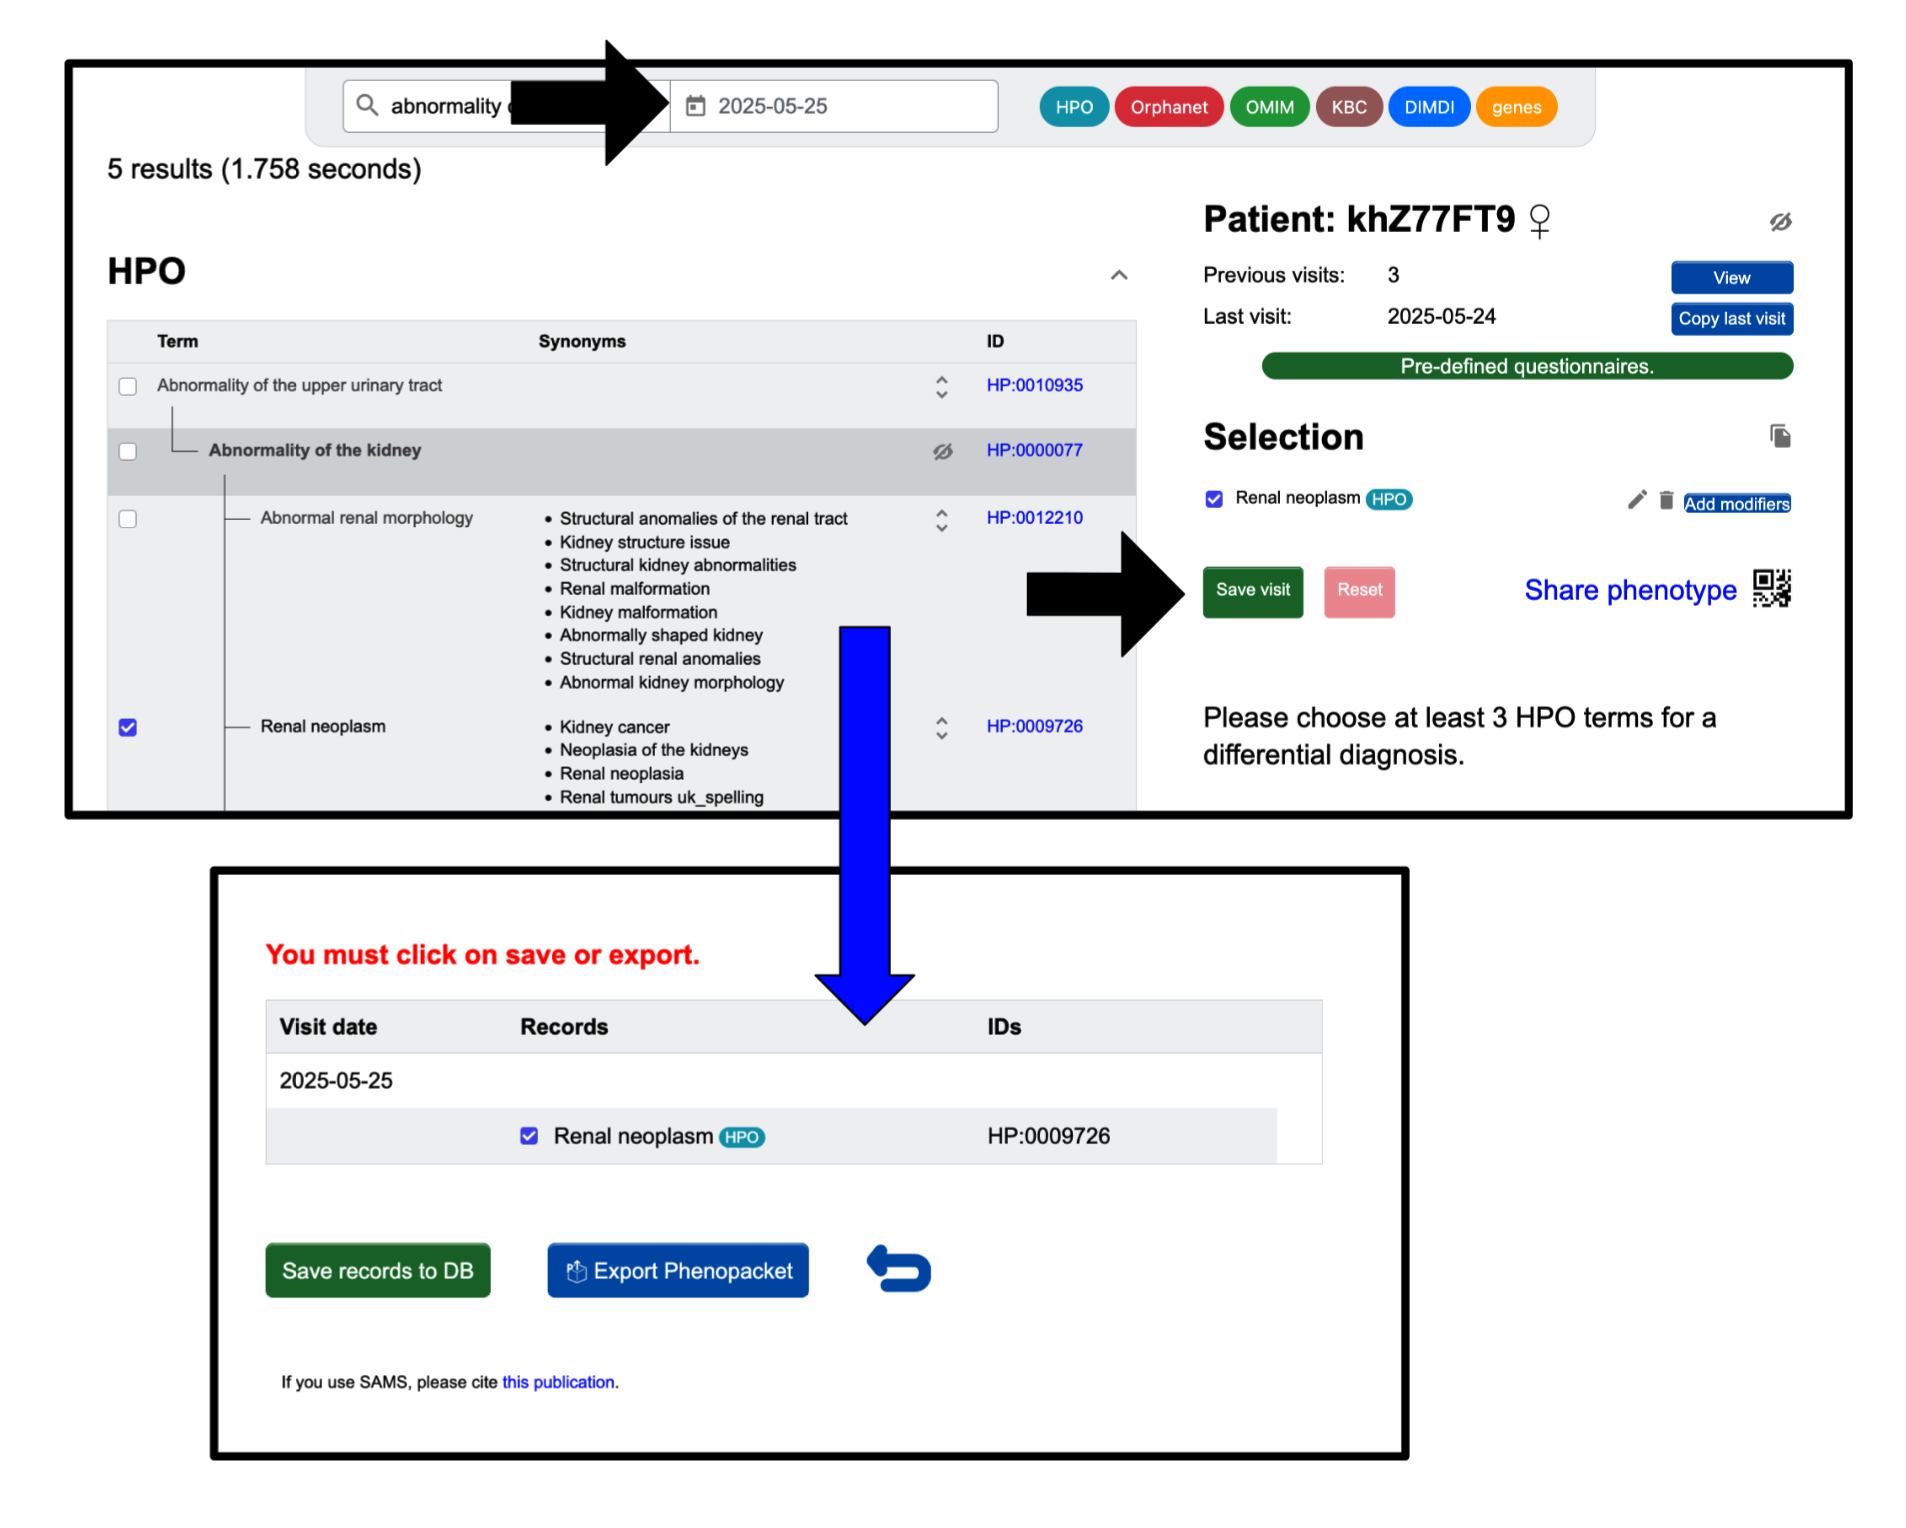
If you wish to reset your selection, you can do so by hitting the Reset button. When you are happy with your selection, finish phenotyping by clicking the Save visit button. The current date will be used, if you have not entered one yourself. This will create a report and save your input when you click Save records to DB. You can also Export Phenopacket if you do not want to store the data in our database, but only save them locally.
Import from text
You have the option to import signs and symptoms from text for a visit. This will be done via the “Enter phenotype” page. Next to ‘Selection’ click on the document icon . A text box will appear where you should fill out the following information for the term:
- Term code
- Present or absent
- Term name
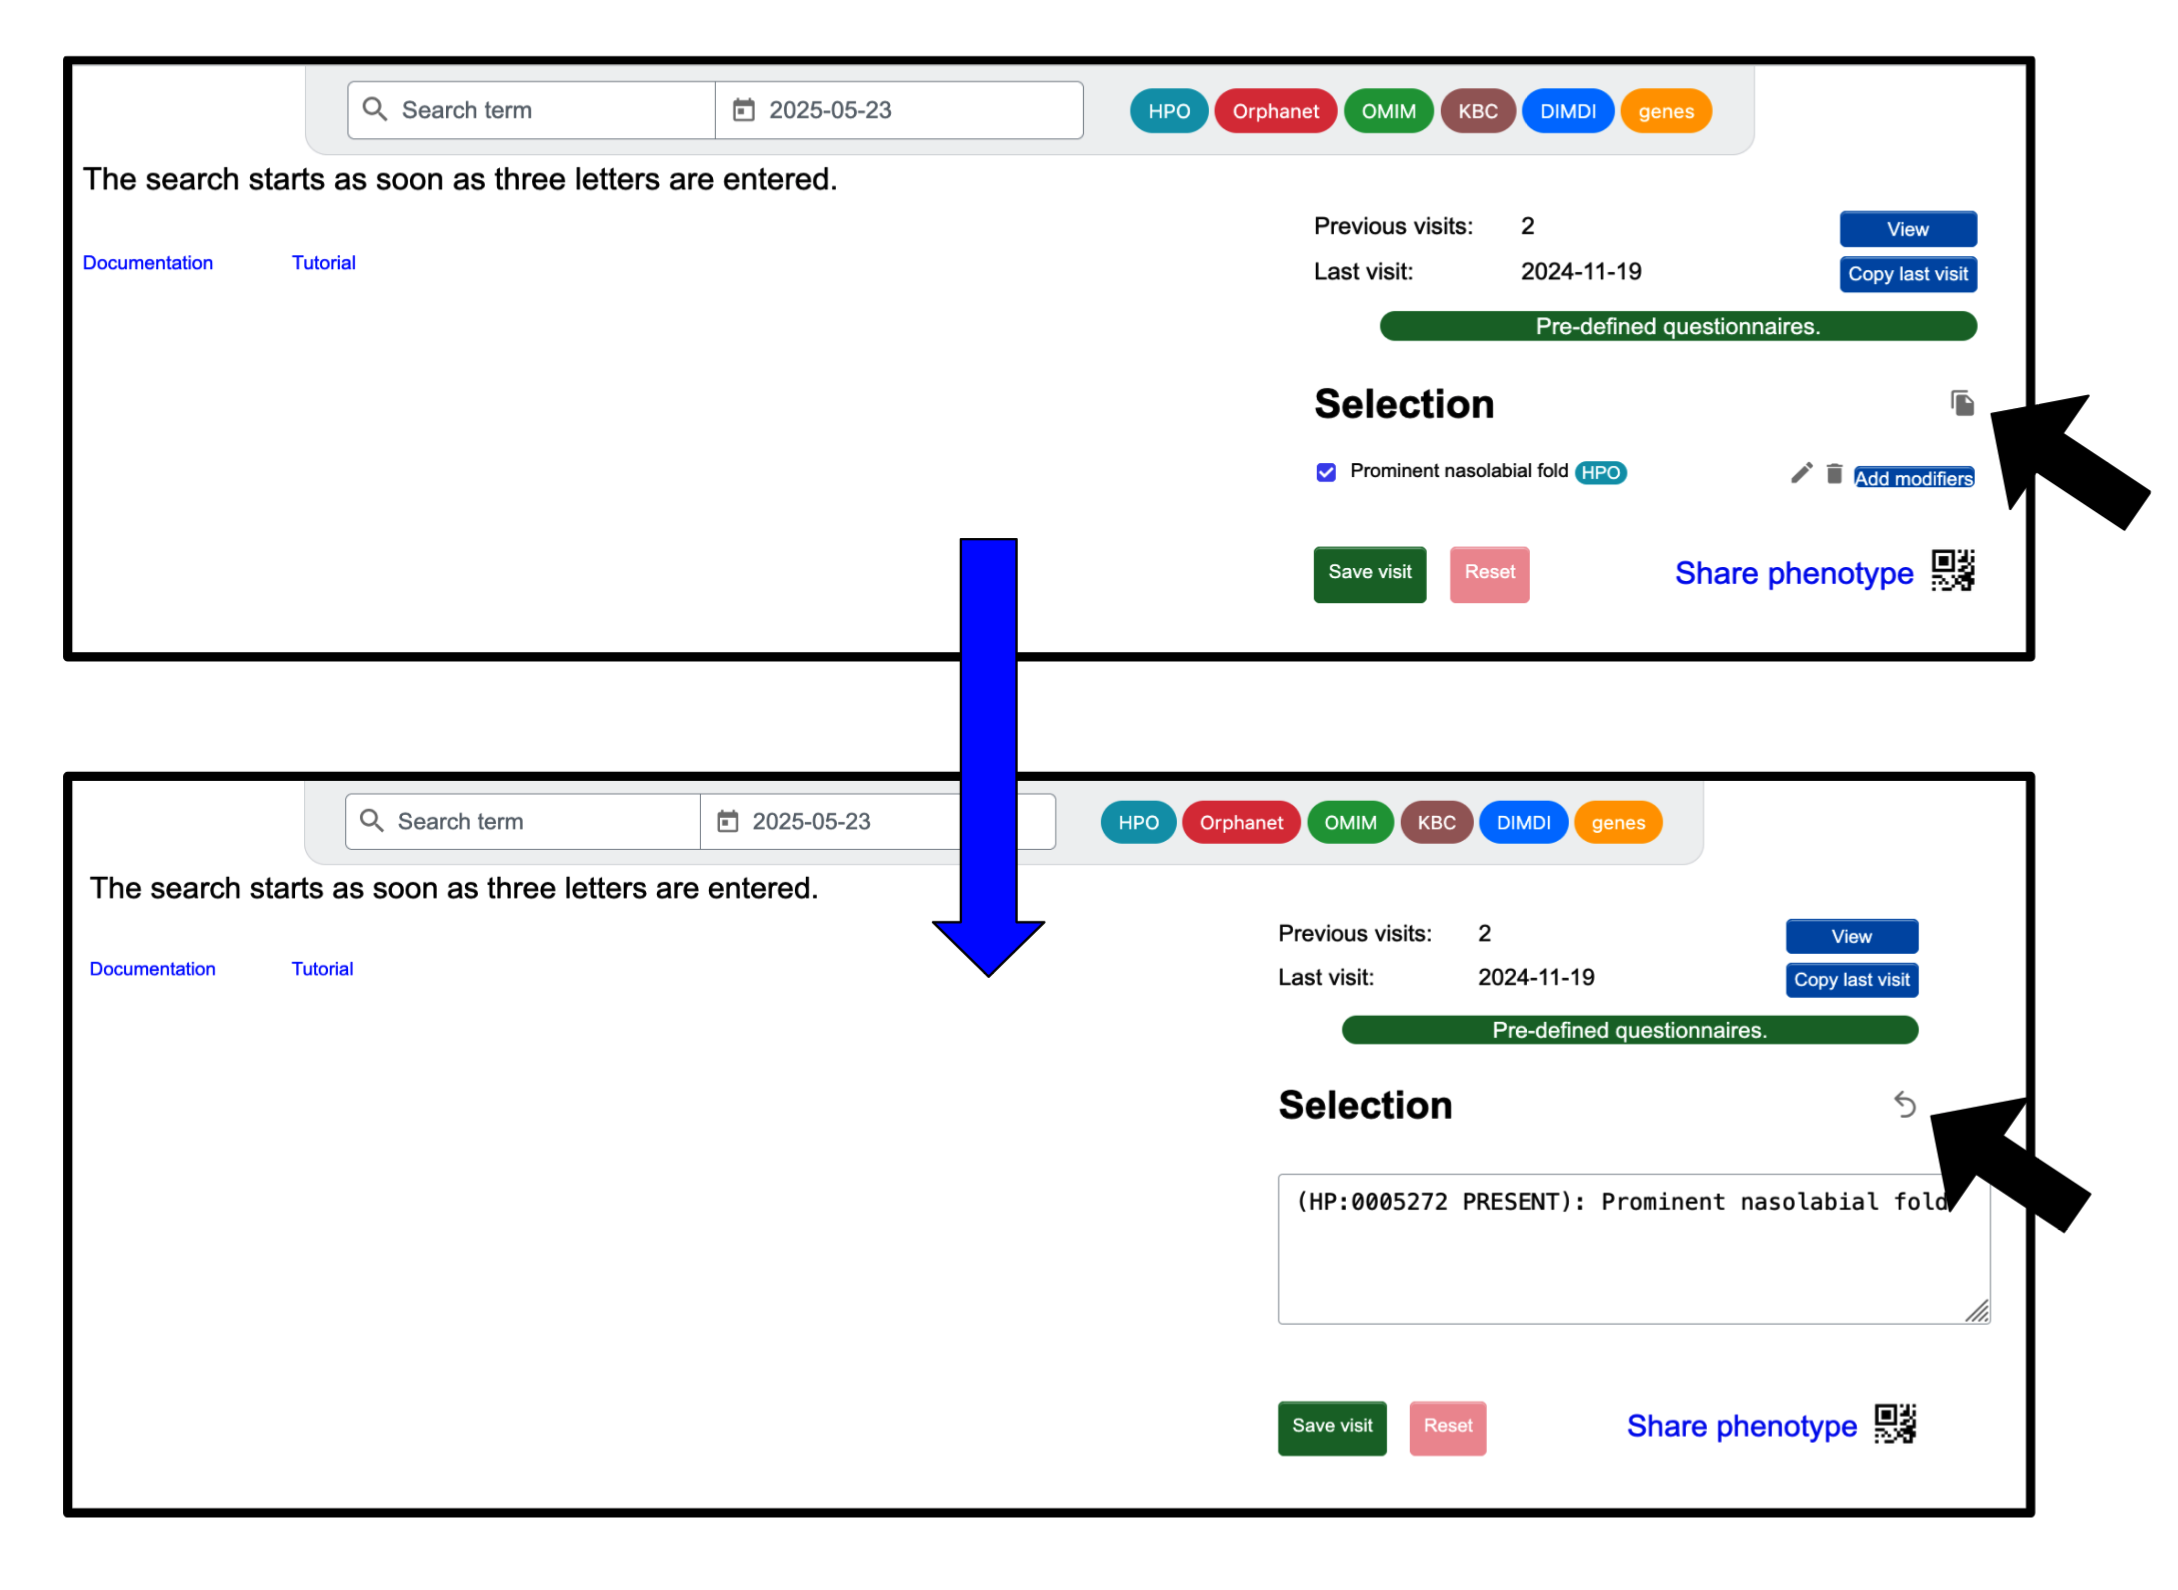
Correctly formatted examples look as follows:
(HP:0005272 ABSENT): Tall stature
(ORPHA:98022 PRESENT): Rare headache
(OMIM:119915 PRESENT): Cluster headache, familial
(KBC:171 ABSENT): Diabetic nephropathy
(ALPHA:15988 PRESENT): Achondrogenesie
(NCBI:207148 ABSENT): TRY7
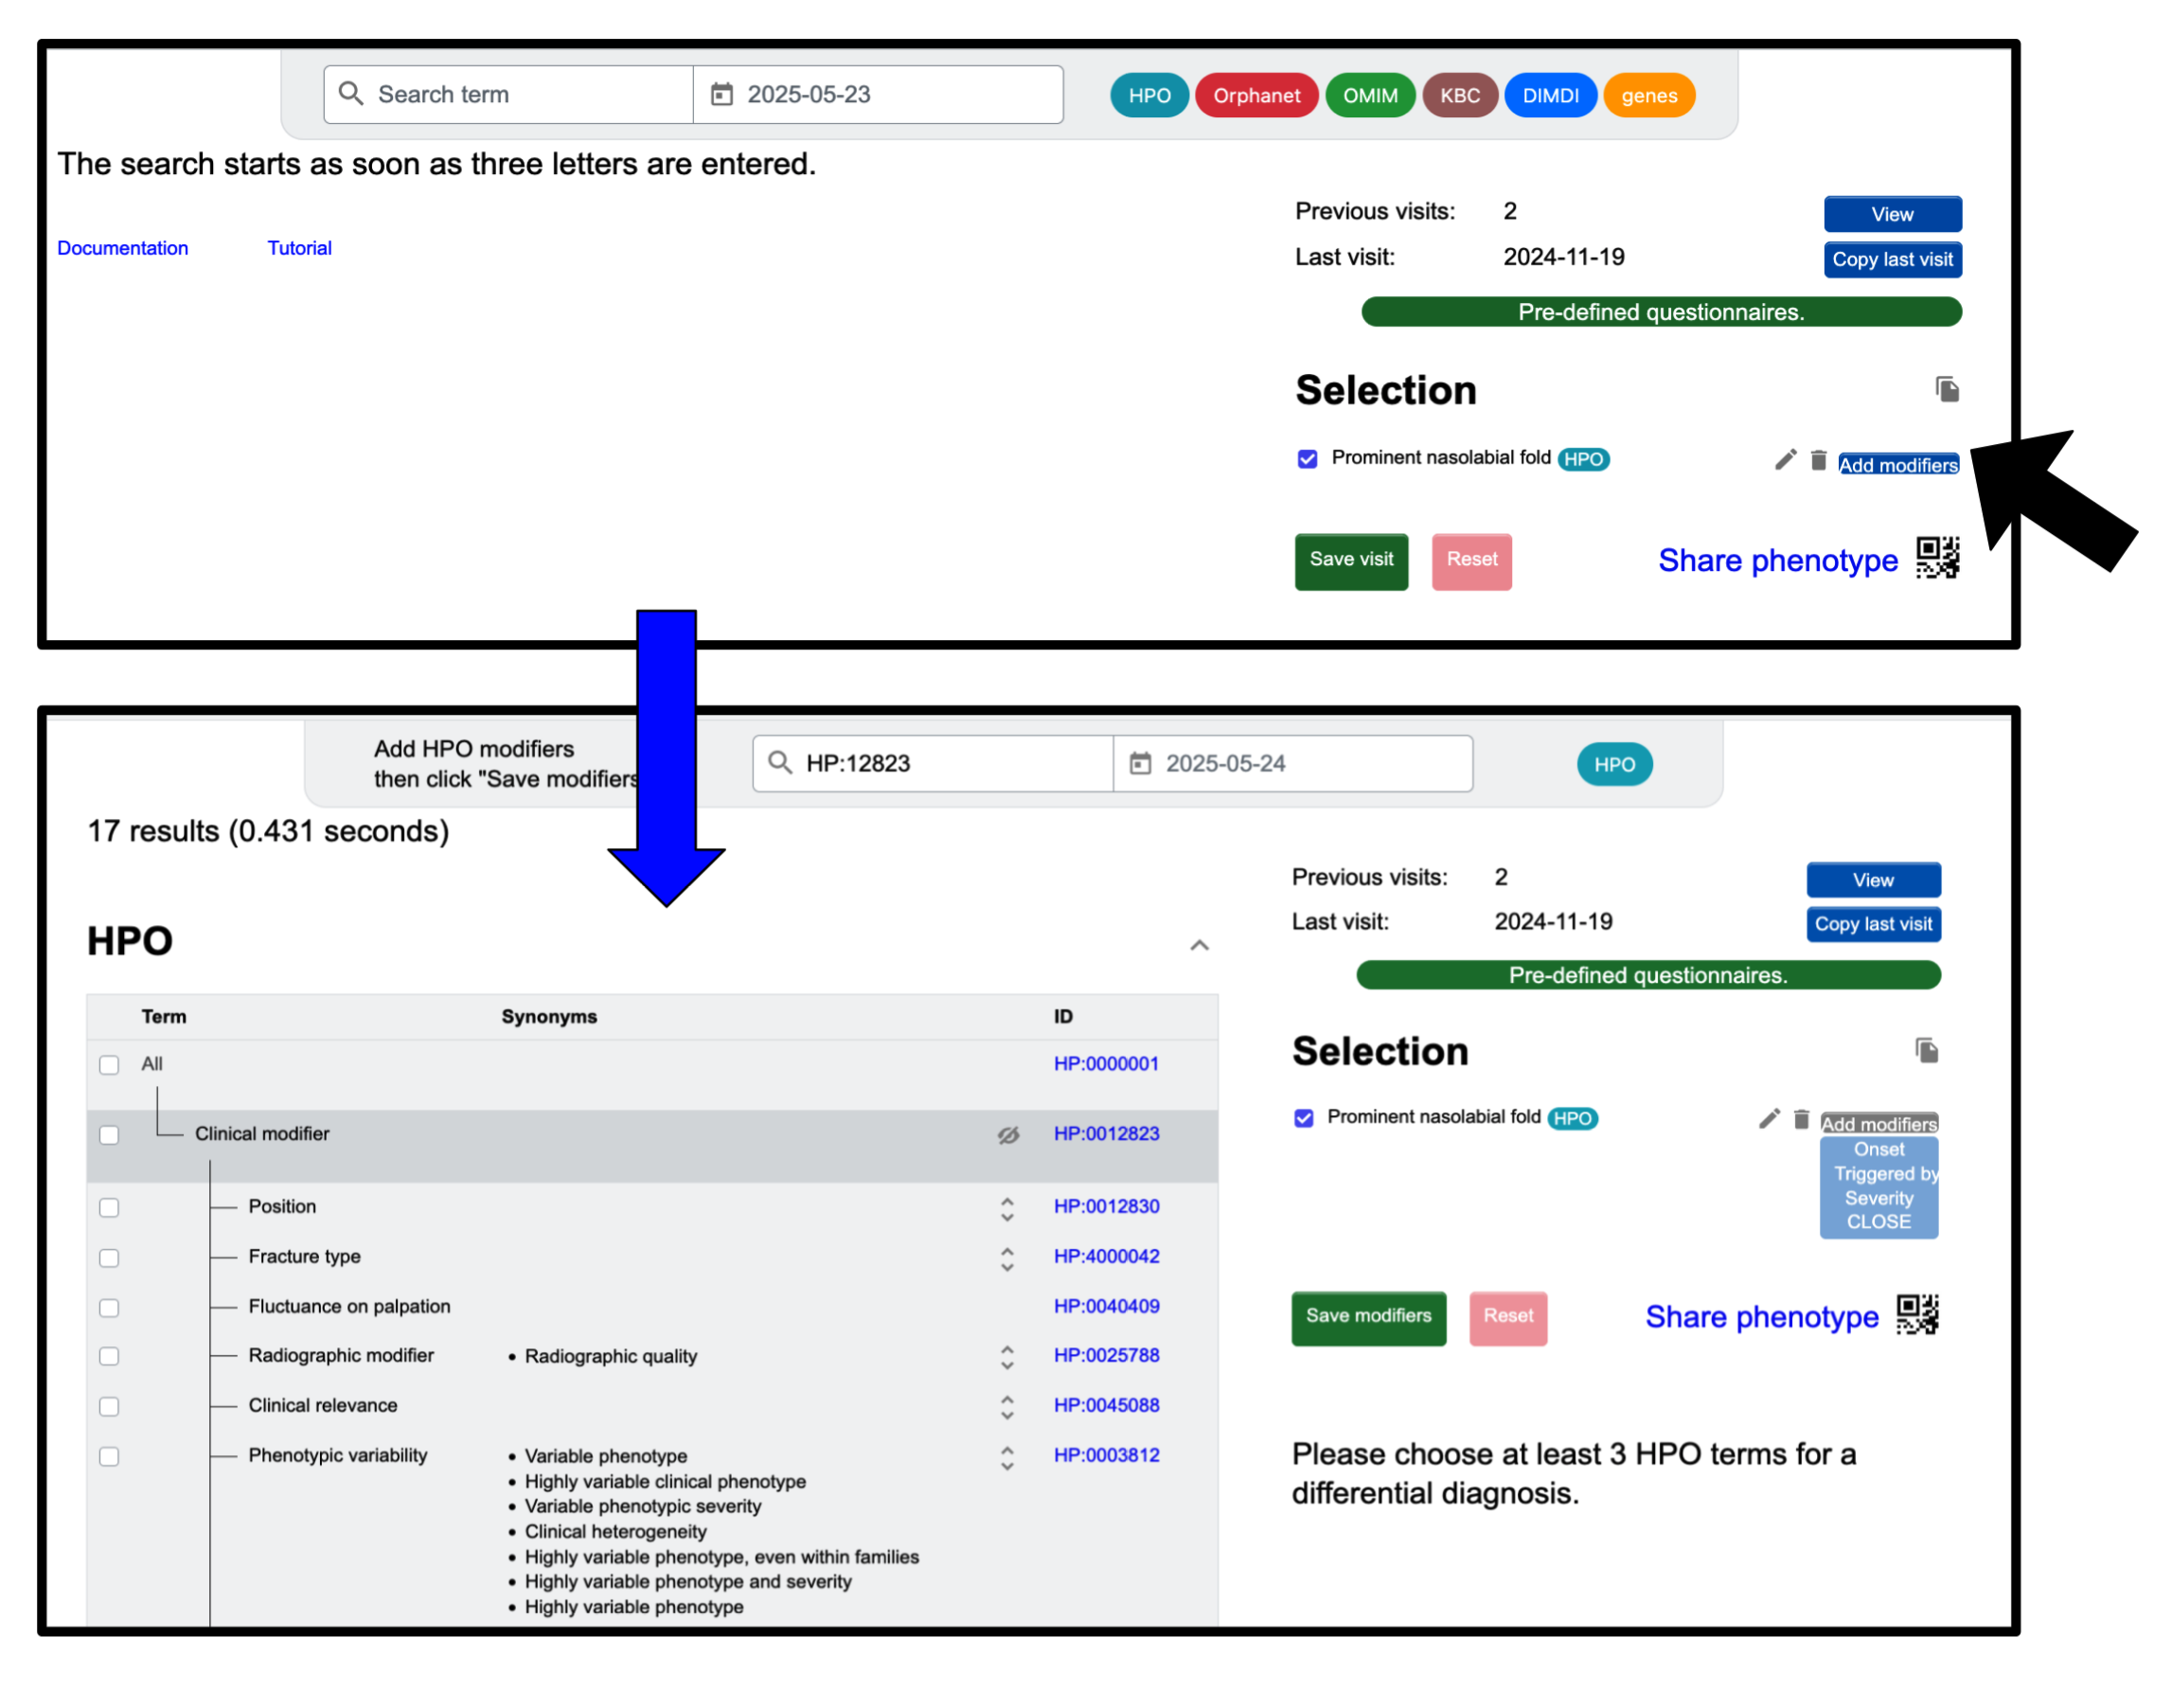
Add modifiers to a clinical finding
It is possible to assign clinical modifiers to HPO terms. This can be done within the “Enter phenotype” page. First, you must select at least one HPO-term, which can be done by searching, then clicking the checkbox to the left of the term. Now the term will appear in the ‘Selection’ section. To select modifiers, click the Add modifiers button next to the term to which you want to assign them. You can then search for a specific modifier from the tree of modifiers now displayed in the center of the screen or use the search bar. When you are satisfied with the selected modifiers, click Save modifiers. Only then will you be able to add more terms that are not modifiers.
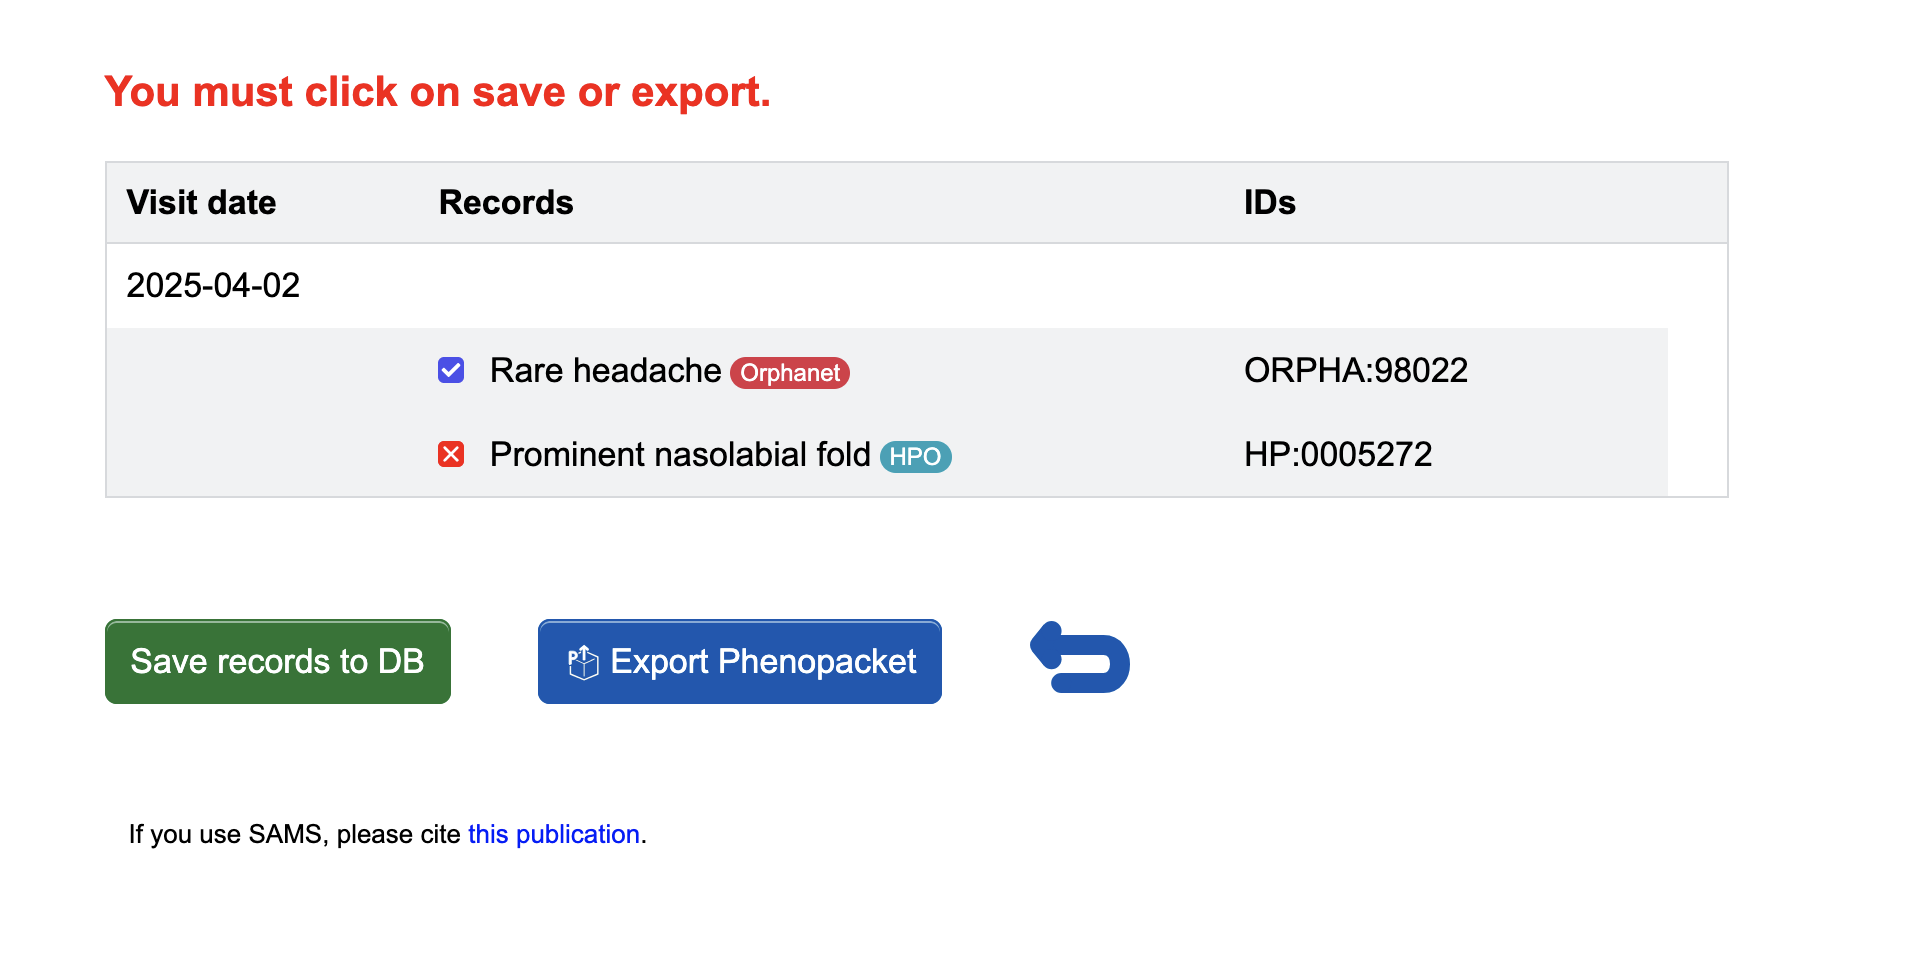
Report presence or absence of terms
The checkbox that is used to mark a term as "present" can be clicked a second time to mark the term as "absent", denoted as follows . Clicking a third time, deselects the term again (in the 'Selection' use the trash-icon ). A deselected checkbox means the term will not be saved.
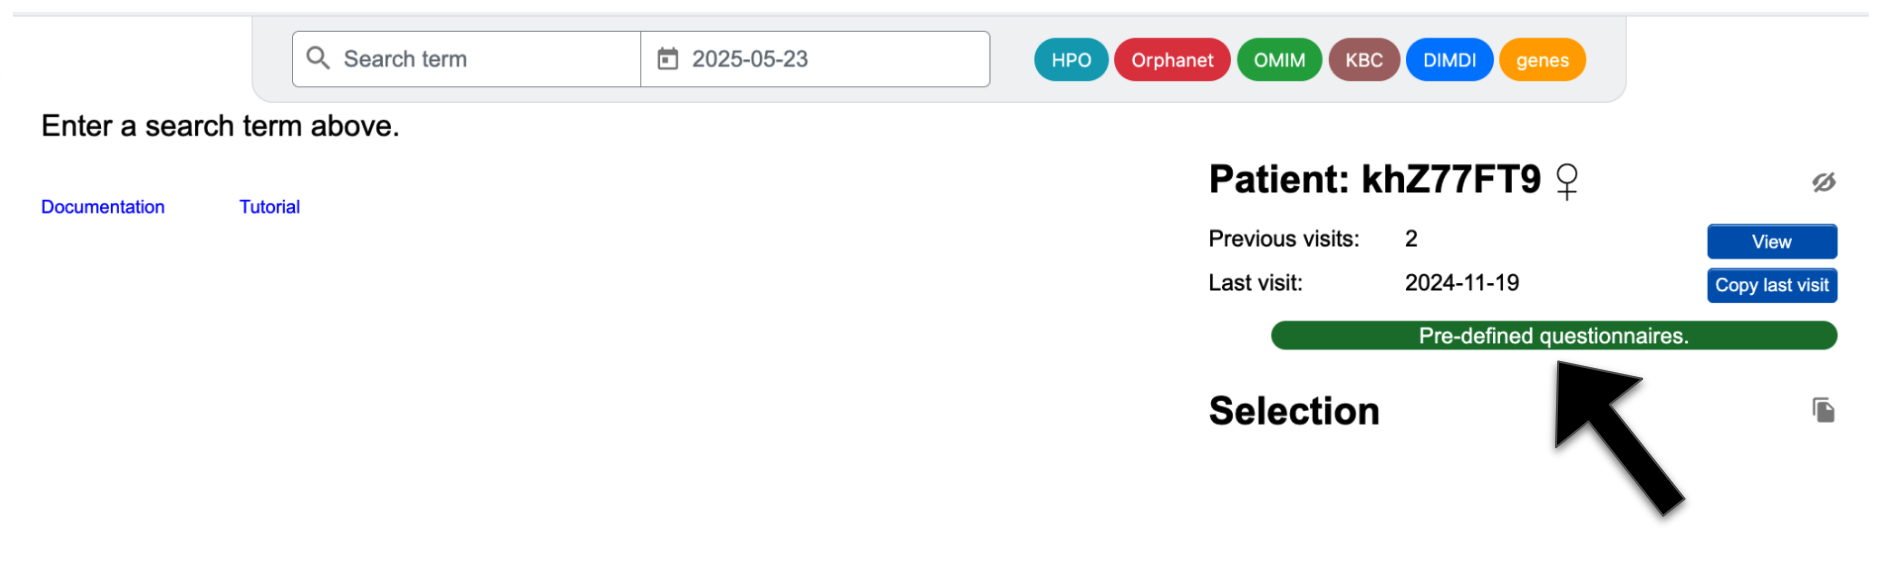
Create a patient visit with a pre-defined questionnaire
If you want to record a patient's clinical signs in a standardised fashion with a checklist, you have the option to do this within the “Enter phenotype” page. One can click on the Pre-defined questionnaires button in green to access user-defined lists.
Alternatively, one may first search for an Orphacode. Once you select an Orphacode and see it in the selection list, you may click Choose signs to access a checklist of signs known to be associated with the disease.
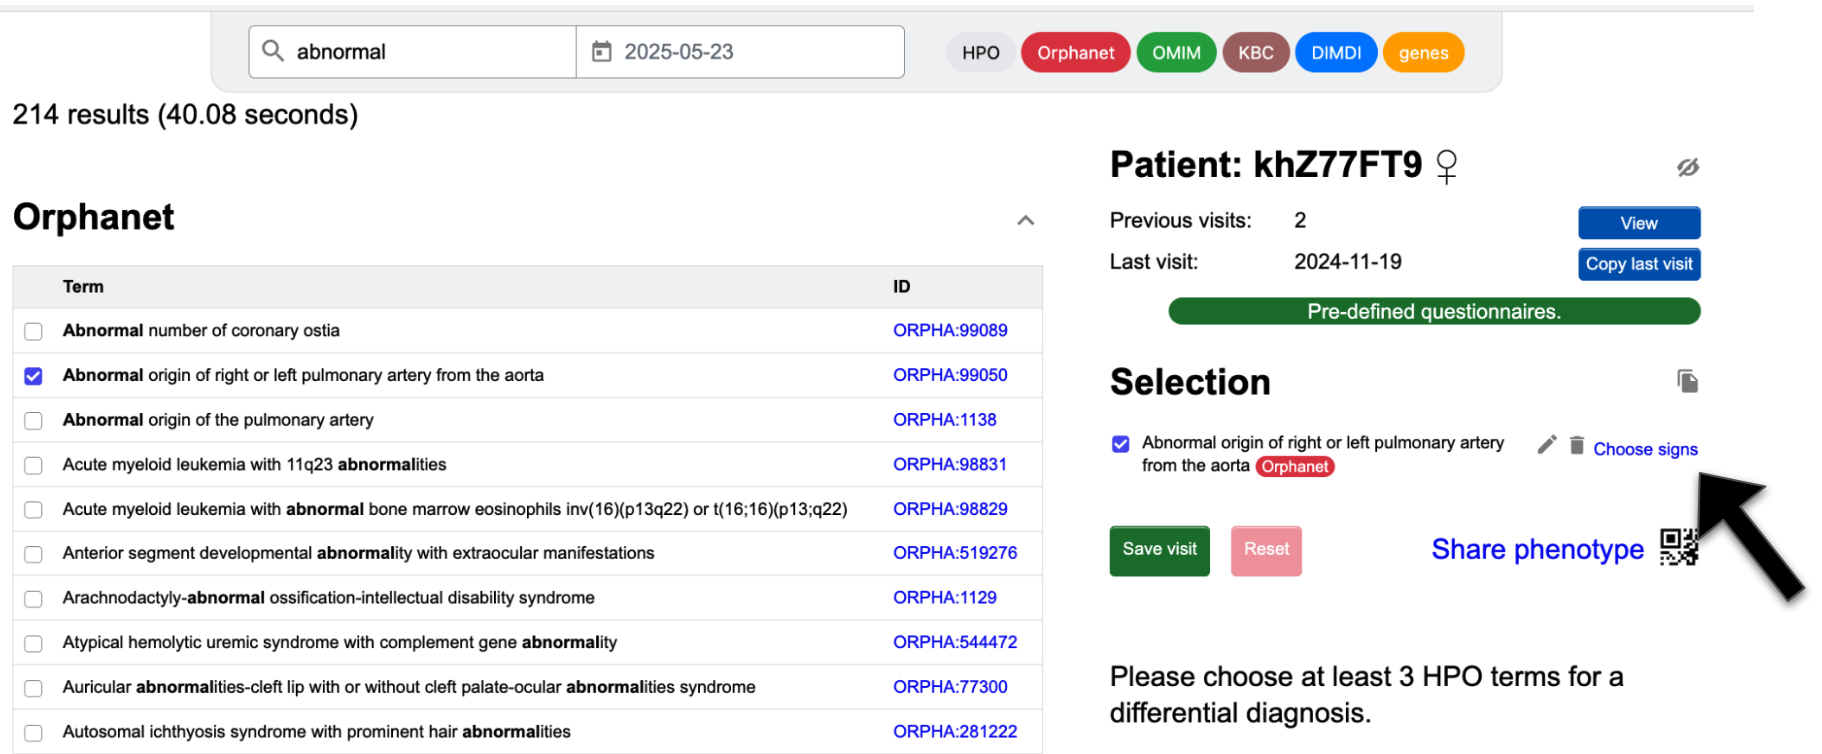
Both options will refer you to a list of HPO (and Orphanet) terms, which will be
transferred to your selection when clicking
Send to SAMS.
Should you want to add a customised questionnaire, please email us!
Modify
Edit and copy previous entries
From the Enter phenotype page:
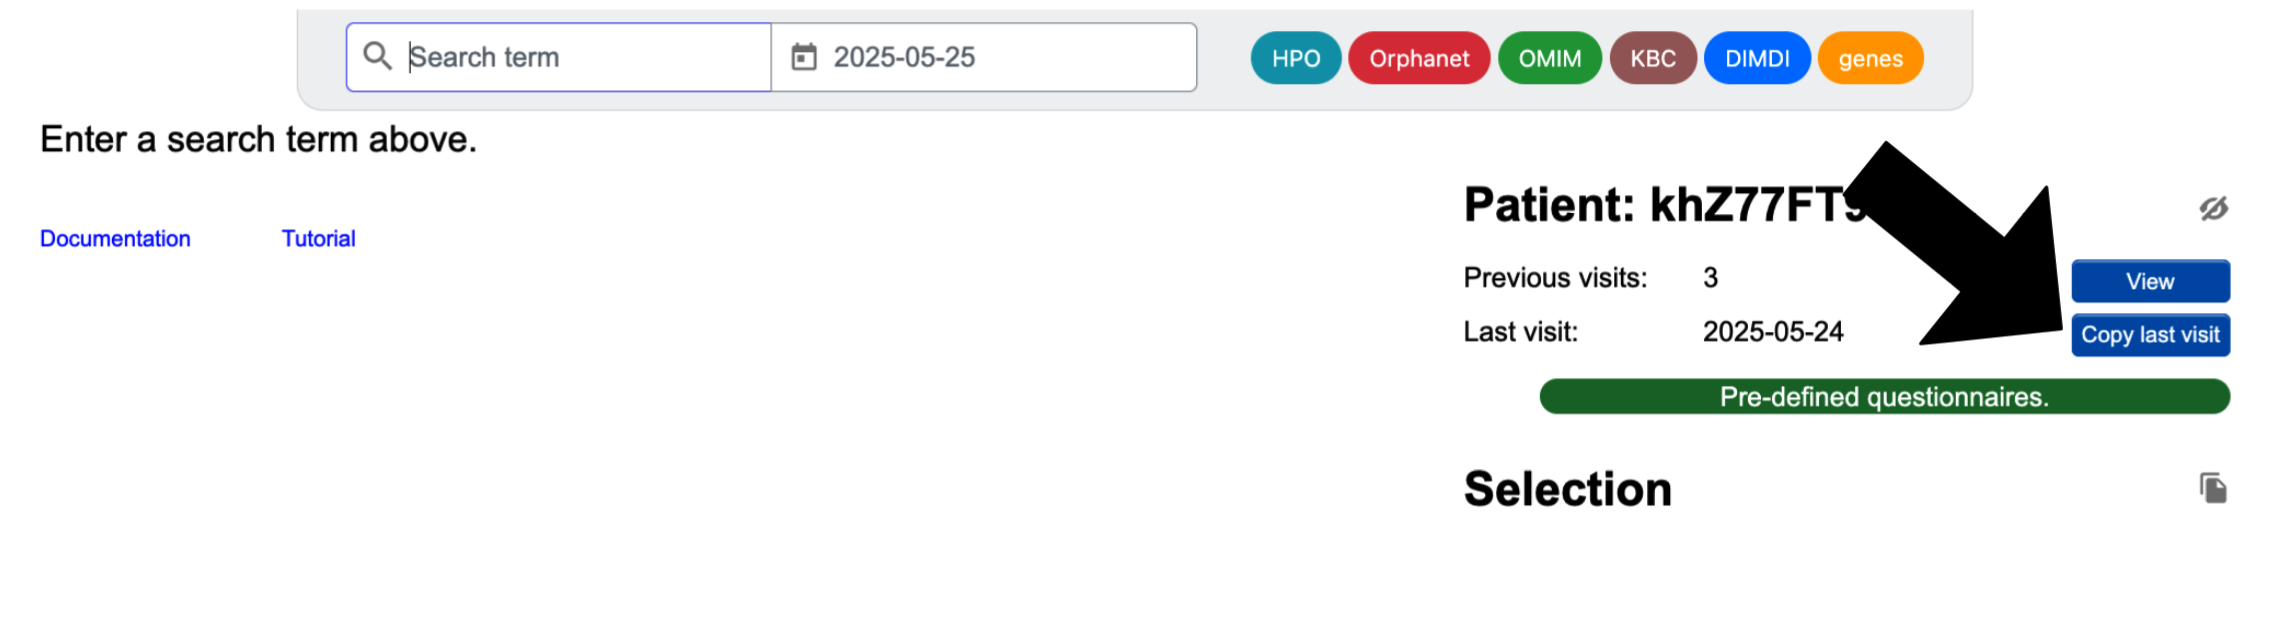
After choosing to add a new patient visit, you will be on the "Enter phenotype" page, and you'll see a blue Copy last visit button on the right side. When you click on this, a list of present and absent symptoms from the previous visit will appear. You may check or uncheck symptoms in order to modify the list.
Alternatively, you can click on the icon to the right of the ‘Selection’ to add terms (as IDs, e.g. ORPHA:287) or to copy the phenotype as text. To turn the text back into the interactive list with checkboxes, click the arrow .
This can be especially useful, if you already know the IDs of the different phenotype terms, or when copying entries from a different patient or previous visit.
From the Patient list page:
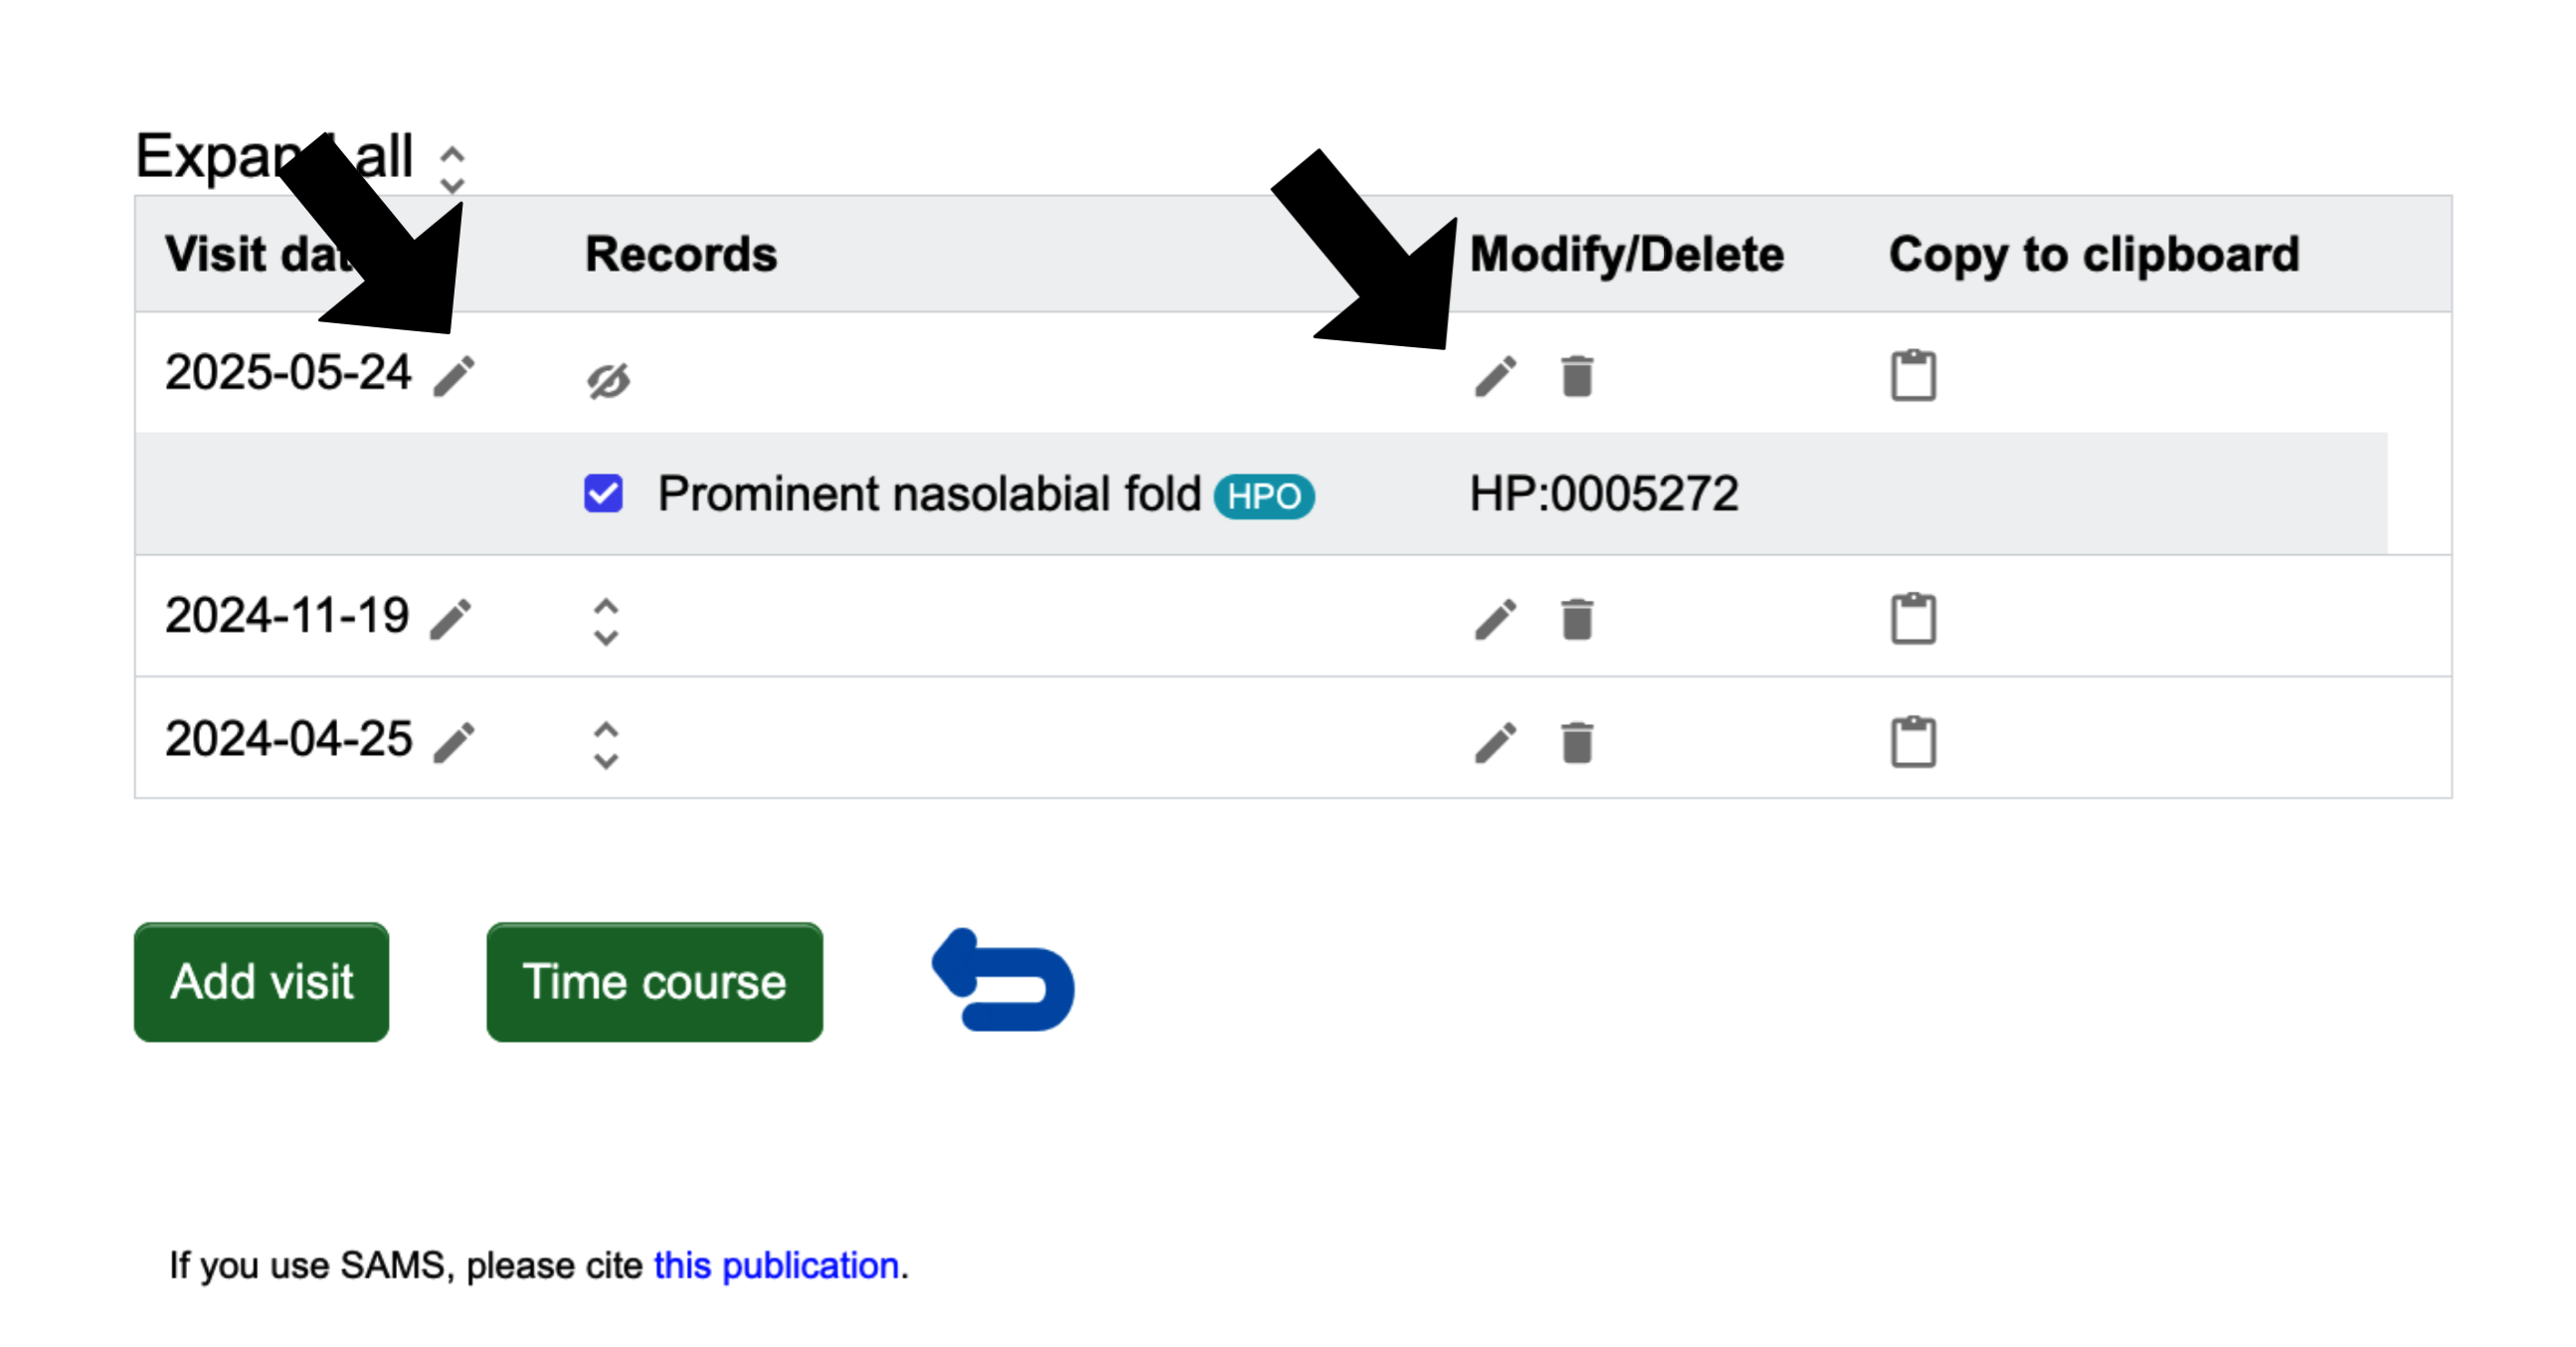
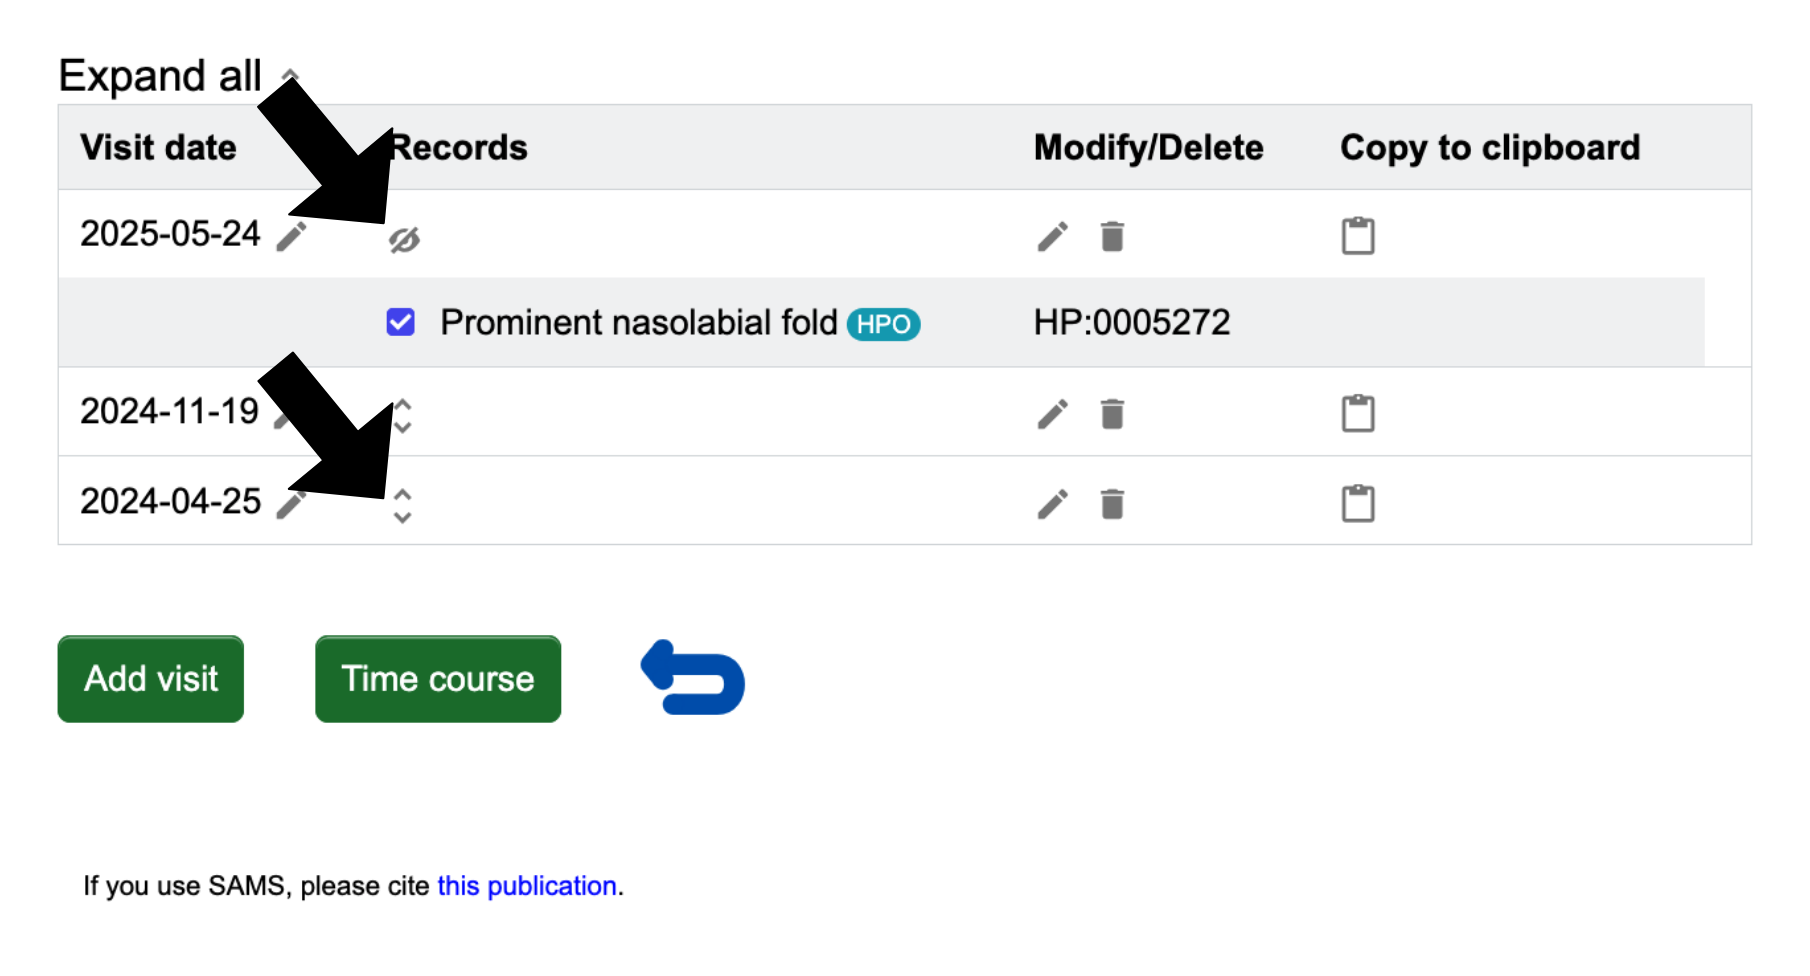
Instead of adding a new visit, you might also want to see and/or modify a previous visit of the patient. This can be done by clicking the blue Display visit(s) on the "Patient list" page. You will be brought to a page that lists each visit date with the option to expand a date to see the records more closely, when you click the up and down arrows
Please note, to the right of each date is a clickable pencil to let you edit the date. Also, the clickable pencil in the Modify/Delete column allows you to edit the records. In the ‘Copy to clipboard’ column, clicking on the document icon will copy the recorded terms of the visit to the clipboard in the same format as in the ‘Selection’.
List
All patients
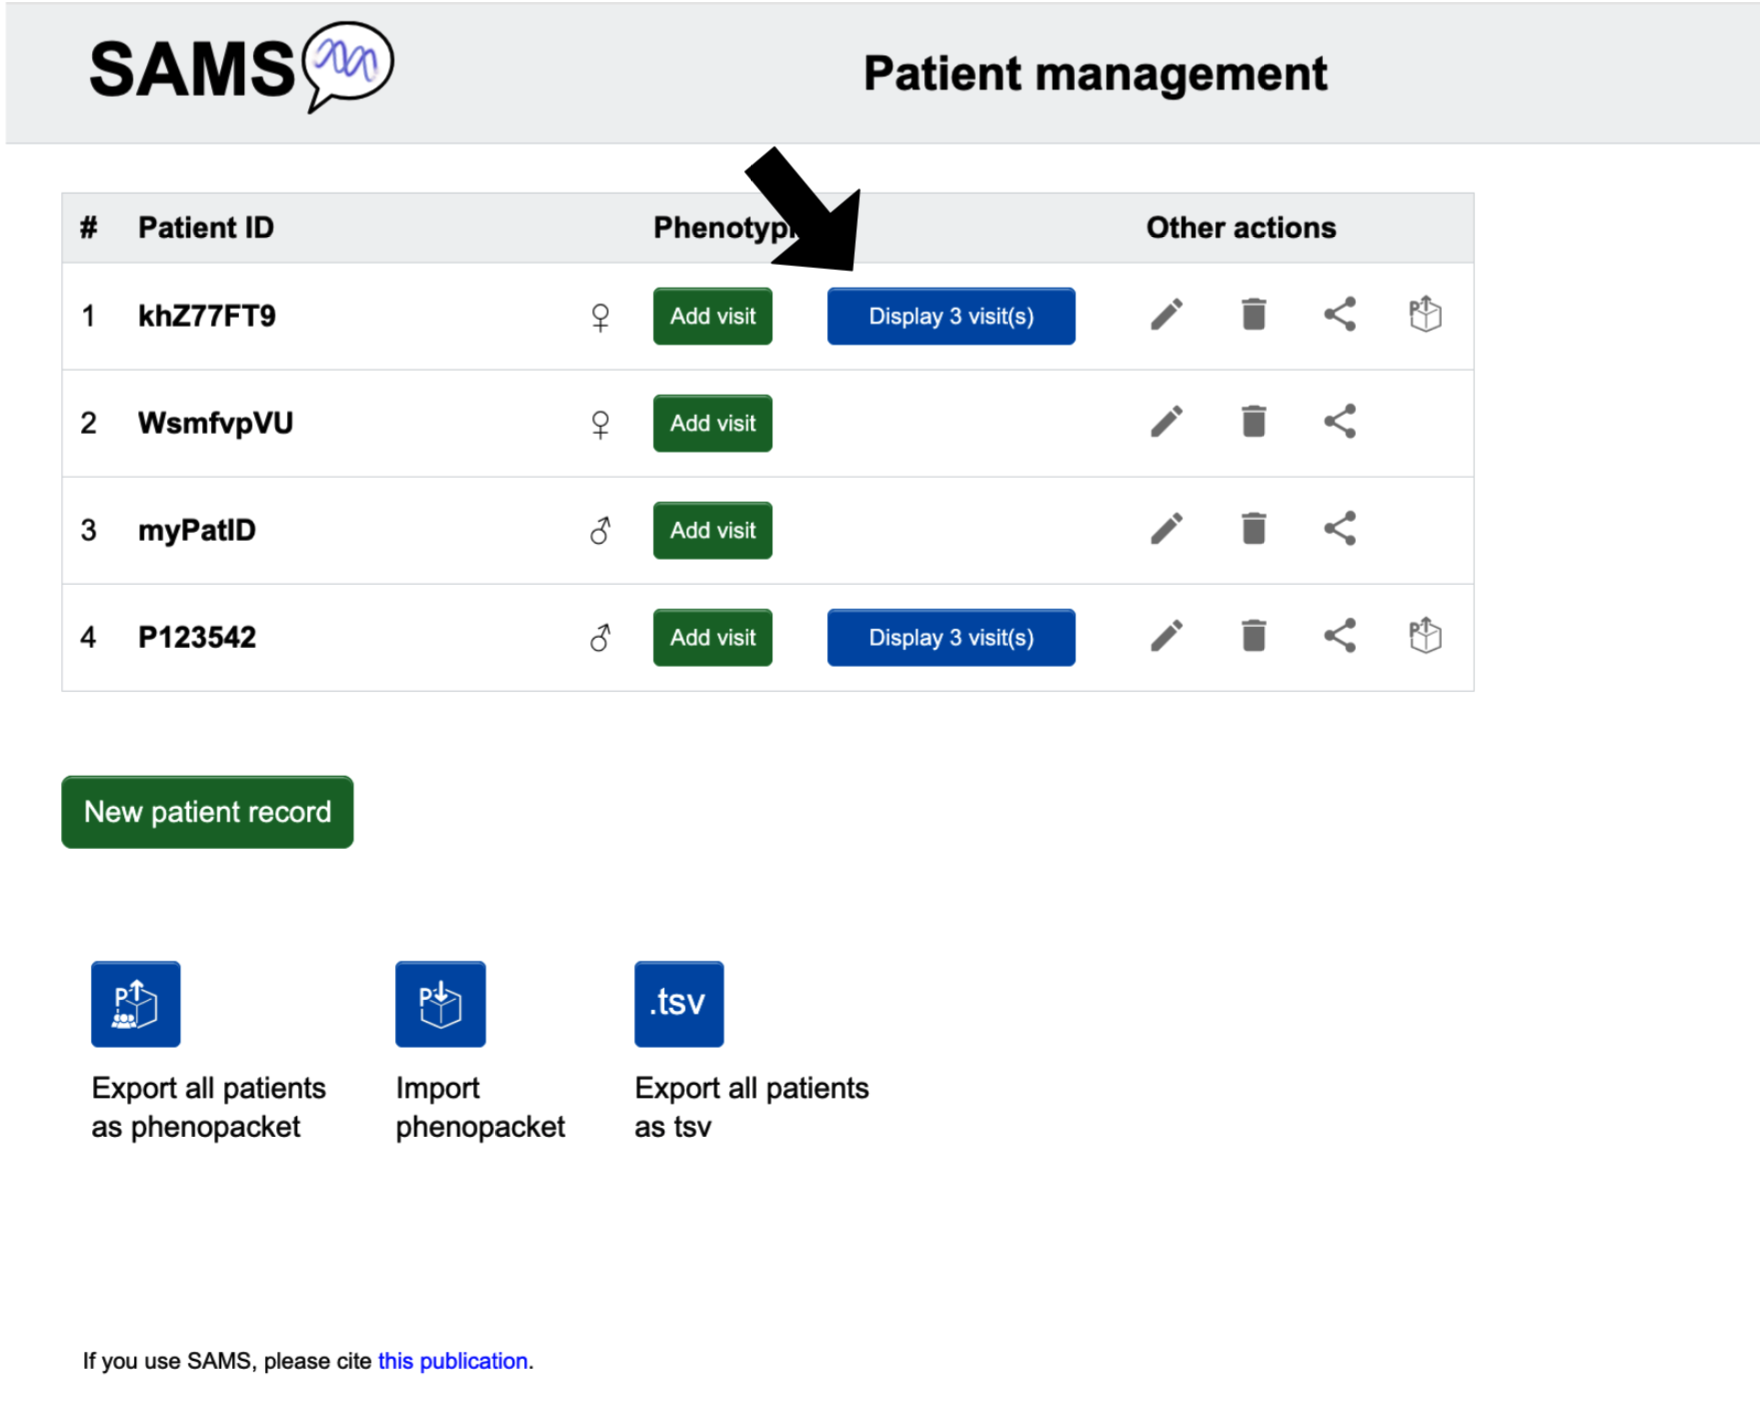
Patients' visits will be displayed as a list on the “Patient list” page. When you are logged in and click on the SAMS icon, you will be brought to the list of patients and visits. Without login you can find lists of visits when you click Try SAMS without registration.
All visits of a patient
From the “Patient list” page, look to the row of the patient you are interested to see. Click the button Display visit(s).
A single patient visit
First, follow the instructions to list all patients and all visits of a patient. Look to the visit date of interest, then click in the ‘Records’ column. To close a record, click until the list collapses.
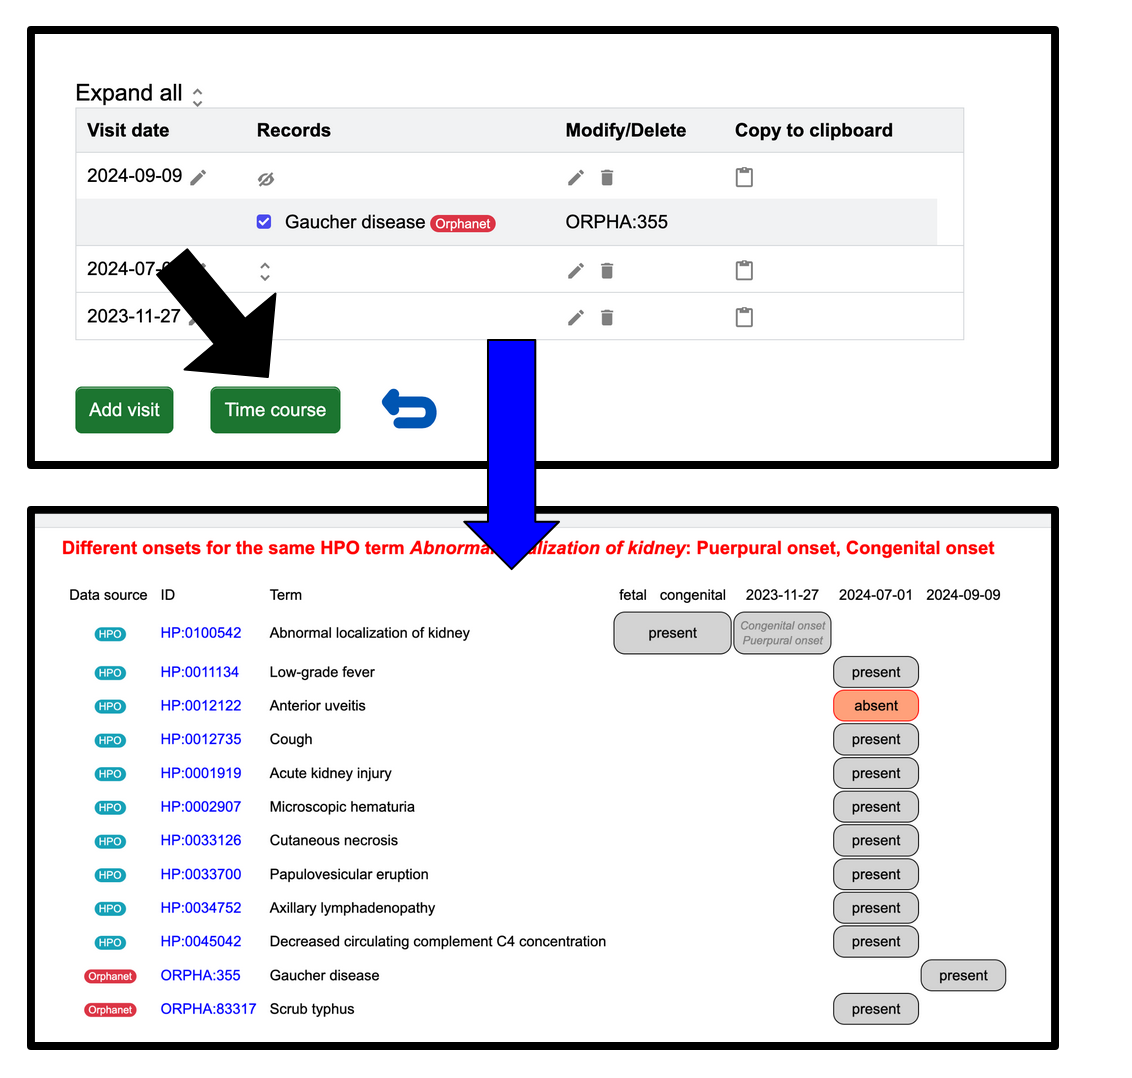
Time course: A patient's symptoms over time
You also have the option to display the changes of signs, symptoms, and diagnosis of a patient over time. You can access this view by clicking the Time course that can be found on the "Previous visits" page.
Below is a hypothetical patient's profile before and after you click Time course. After clicking one can see in each row a sign or symptom explicitly present (grey) or absent (red). One can see to the left of each sign and symptom the data source. For this example the last row contains the diagnosis as Orphanet "Systemic lupus erythematosus". The diagnosis stays present over time, while the HPO signs and symptoms change following treatment.
Share
Patient information can be shared in a number of ways.
To share the phenotype of one patient visit, you must go to the “Enter phenotype” page for that specific visit of the patient:
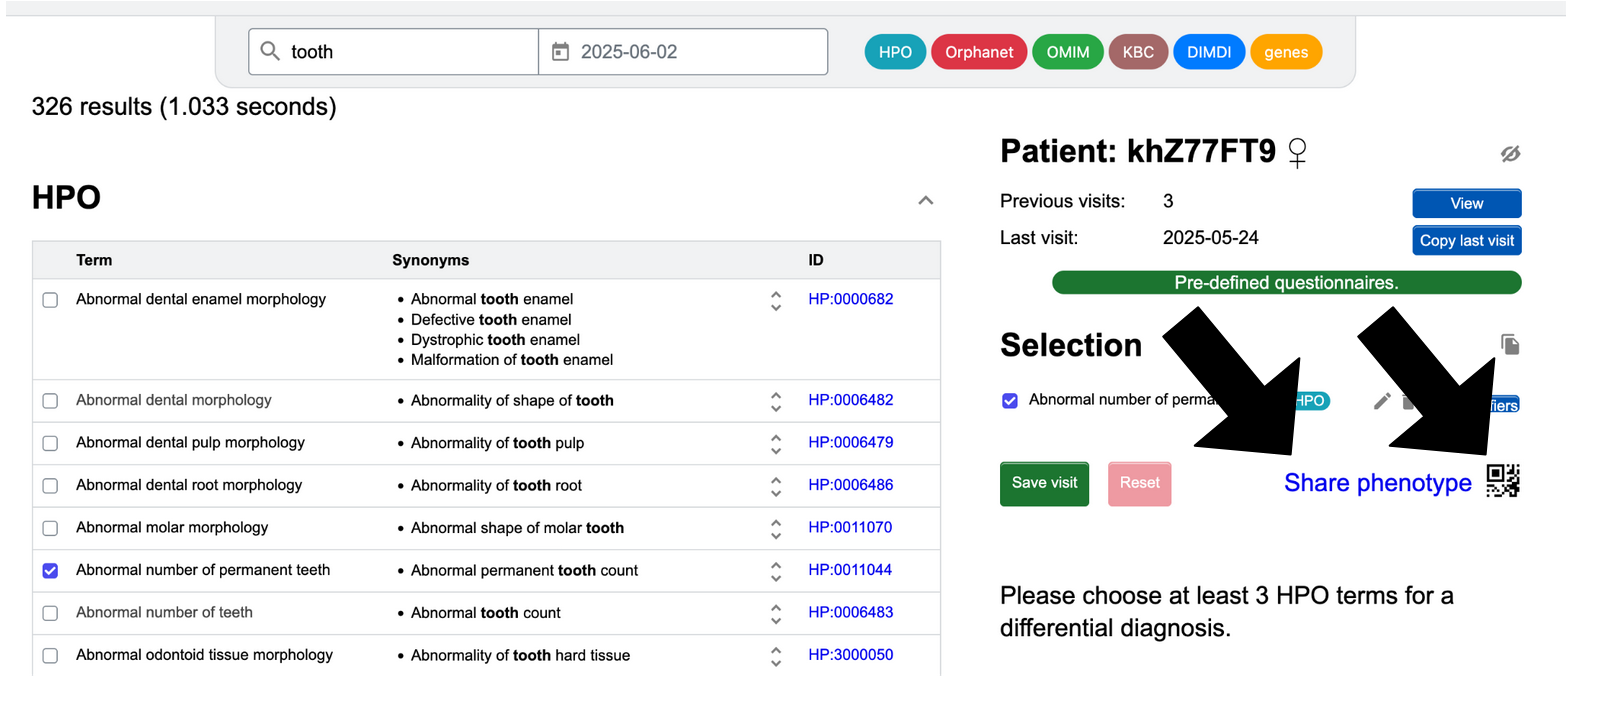
- With a QR code: Click on the QR code symbol in the right-hand side column. Scan the QR code that appears, which will open a URL with the patient phenotype. The recipient can see the patient's phenotype, but additional changes will not be reflected in the link. If you want to add or modify data of a patient shared with you, you can export the patient as a Phenopacket and re-import it.
- With a link: Click on “Share phenotype”. This is the link that is embedded in the QR code and behaves the same way.
To share all of the visits for a patient:
- With a link: This can be done by clicking the Share phenotype symbol in the right-hand column on the "Patient list" page. A sharing link will appear. It is only active for 24 hours and the recipient must be logged in to accept it.
- With a Phenopacket: You may import and export Phenopackets. For details see section Import & export Phenopackets below.
Import & export Phenopackets
Patient information can be imported/exported as GA4GH Phenopackets.
If the arrow on the icon is pointing down then the phenopacket will import, and if the arrow is pointing
up then the phenopacket will export.
Read more about Phenopackets in the Phenopackets documentation or in the scientific publication.
Import
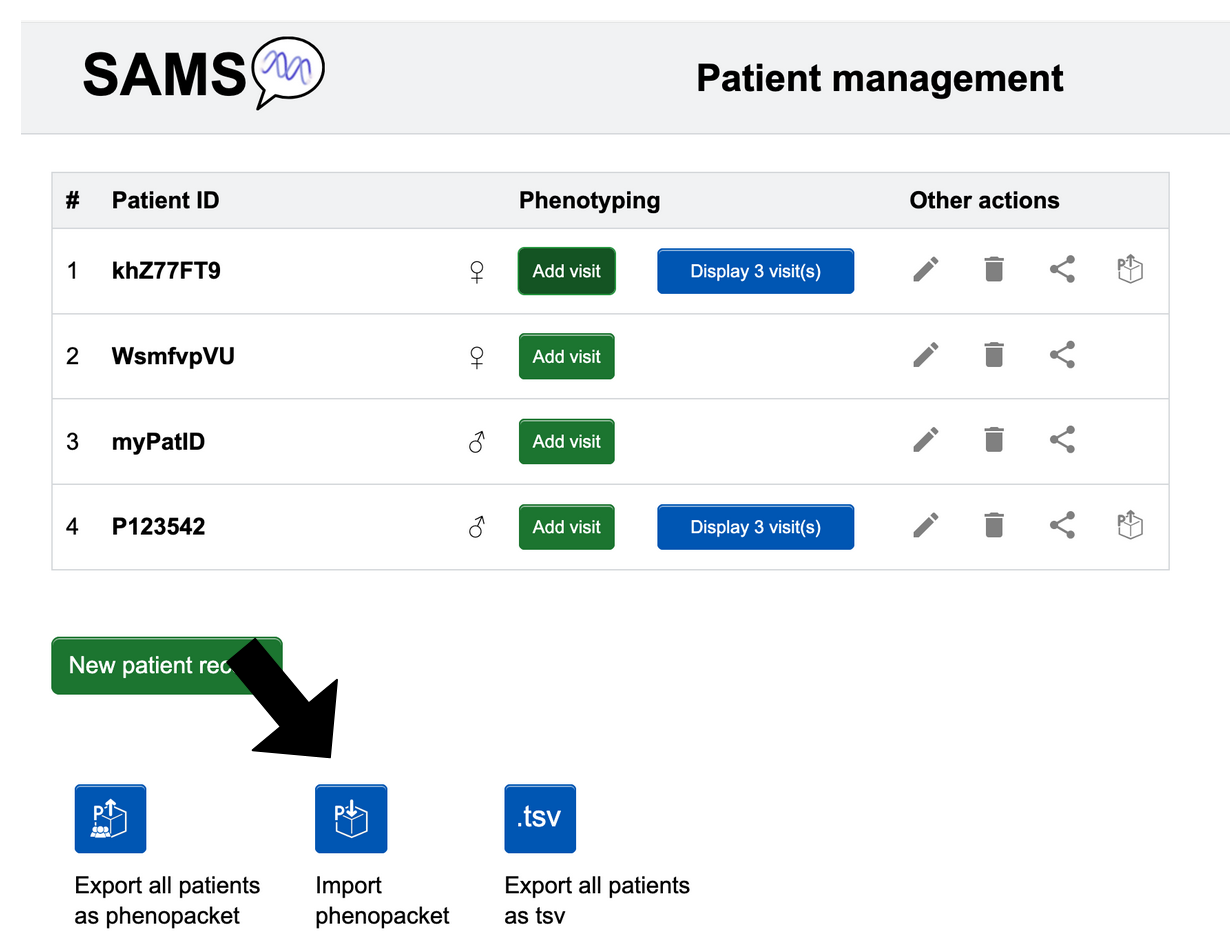
GA4GH Phenopackets can be imported into SAMS via “Patient list”. Click the Import
Phenopackets found at
the bottom of the page. You will be prompted to import a JSON file.
If you have uploaded one Phenopacket, you may then select the patient
visit dates you would like to import. If you have uploaded multiple Phenopackets at once they will be imported without review.
Export Phenopackets
From the "Enter phenotype" page:
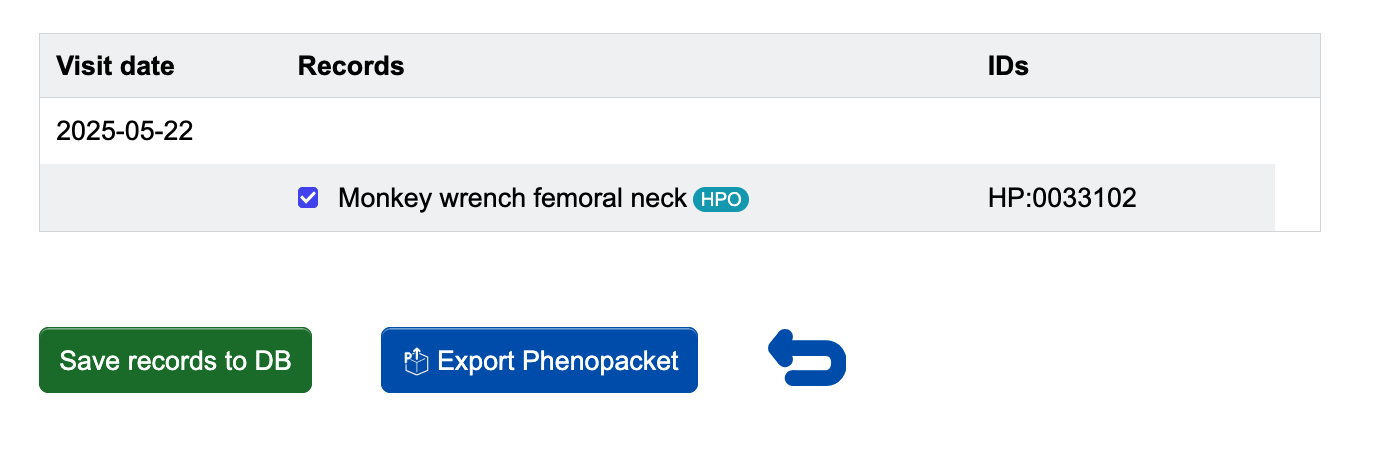
Once you have made the selection of signs and symptoms you would like to include for a visit, click the green Save visit button.
You will be brought to a page where you have the option to Export Phenopacket. When you click it, a JSON file containing the phenopacket for the visit will download to your computer.
From the "Patient list" page:
- Individual patient: When you are in “Patient list” (usable with and without an account), look at the ID of the patient you want to export. Look to the far right in that row, then click the following button .
- All patients: In “Patient list”, look below the list of patients for the blue Export all patients button that you can click.
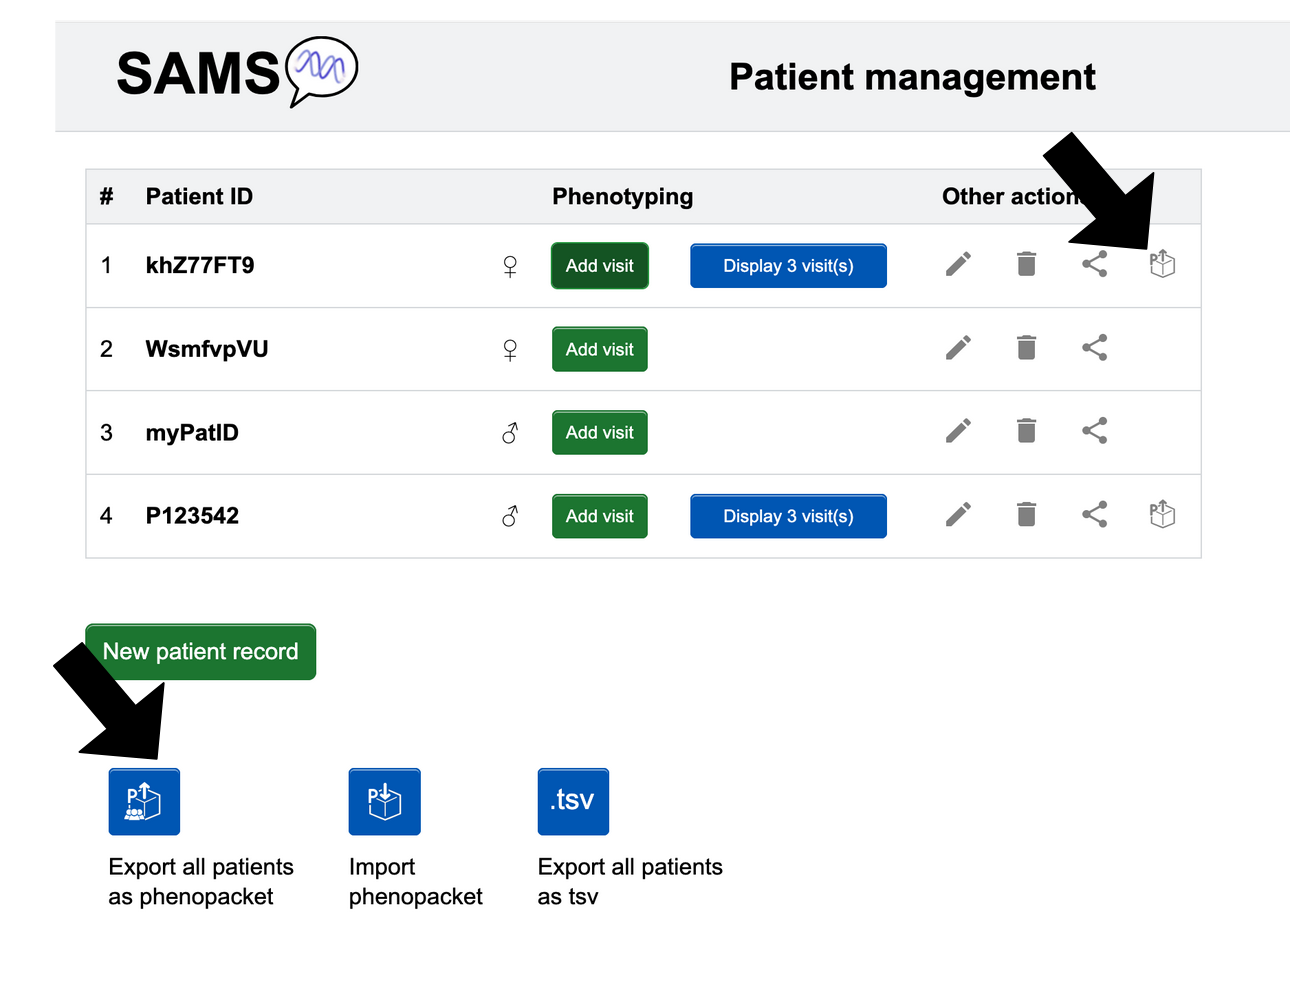
The patient(s) information will be automatically saved as a Phenopacket in JSON format.
SAMS download
The source files are available at https://git-ext.charite.de/genecascade/sams. Please note that we cannot provide support for locally installed versions.
About
SAMS with all of its functions is and always will be completely free of charge. However, you must cite us.
Contact
If you have any questions or suggestions, please contact us at sams@bih-charite.de.